
eSIM Installation Guide
Select Language
Check Device Compatibility
First of all, for any device, you need to check if your device is compatible with eSIM technology. Not all devices support eSIM, so it's crucial to verify this first.
To check the compatibility, visit our compatibility guide
Jump to your phone brand:
Quick Installation Tips
• Install your eSIM the day before your trip for a smooth experience
• Use QR code method when possible - it's faster and more reliable
• Always keep your primary SIM for calls and use eSIM for data
• Make sure data roaming is enabled on your eSIM after installation
General Installation Steps
We recommend installing the day before your trip and activating it by selecting our eSIM for 'mobile data' on your phone settings, once you arrive at your destination. Use QR Code Installation if you have another device you can scan from, alternatively follow the Manual setup instructions.
What You Need Before Starting
• A phone compatible with eSIM technology
• The installation email with QR code from your provider
• Stable internet connection during installation
Installation Instructions by Device
iPhone
Apple was one of the first brands to fully embrace eSIM technology. Follow this comprehensive guide to install and activate your eSIM on your iPhone device.
What You Need
• An iPhone compatible with eSIM technology
• The installation email with QR code
• Stable internet connection
QR Code Installation
Use this method if you have another device to scan the QR code from your installation email.
Installation Steps
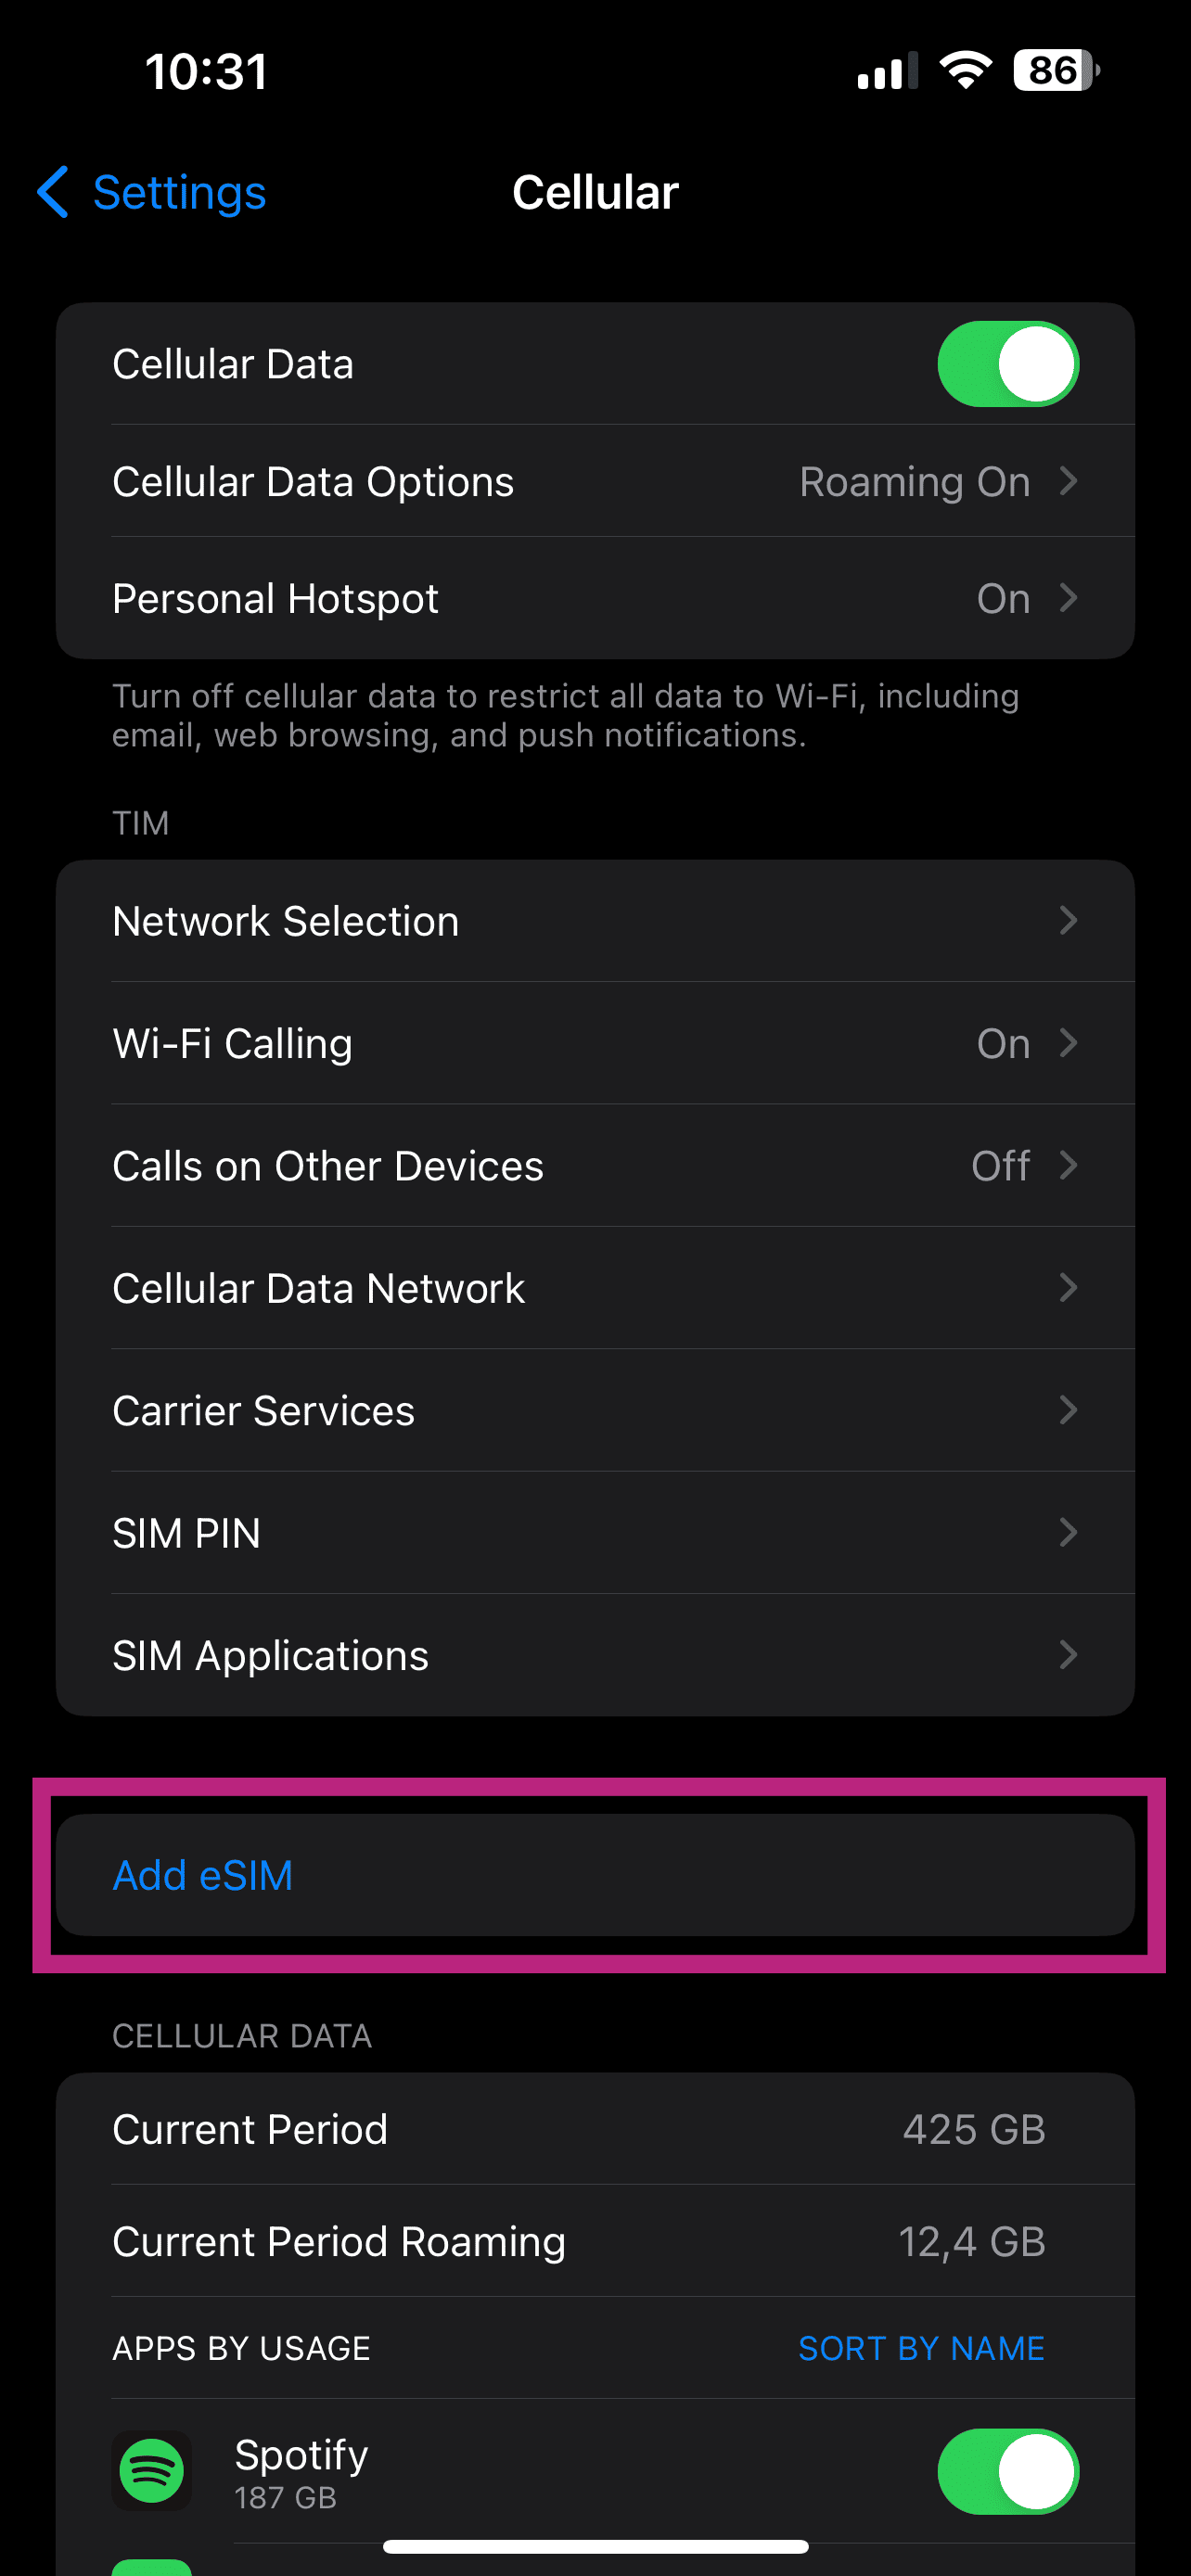
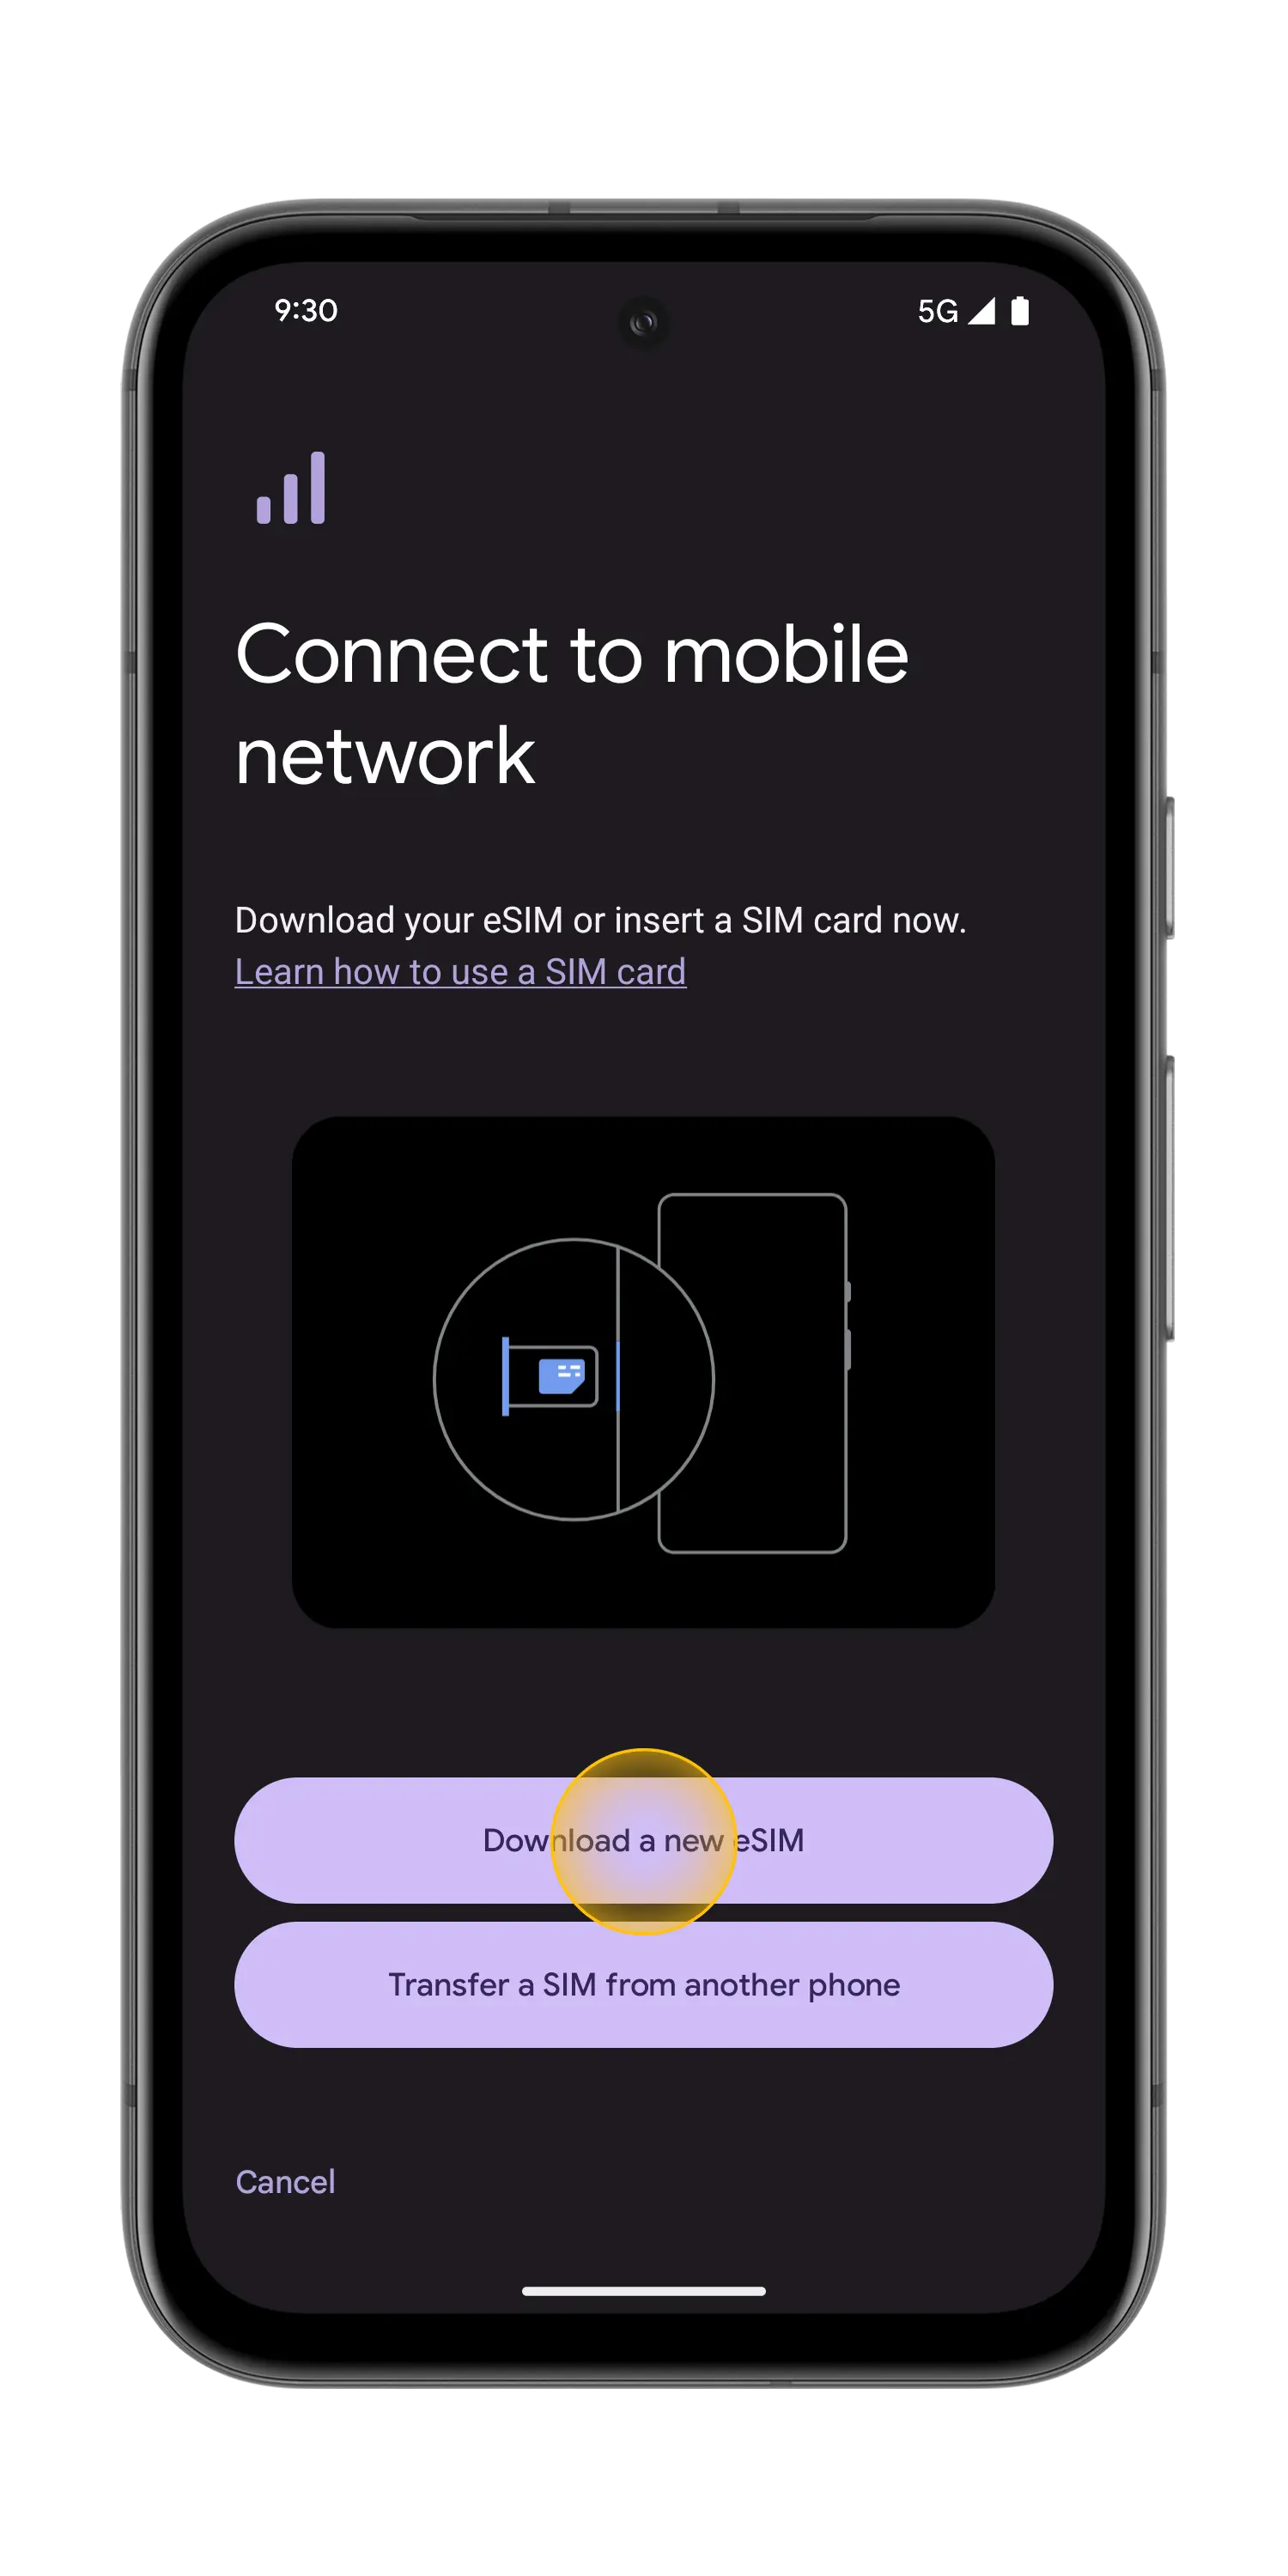
Add eSIM
Go to Settings > Mobile Service/Cellular and tap "add eSIM"
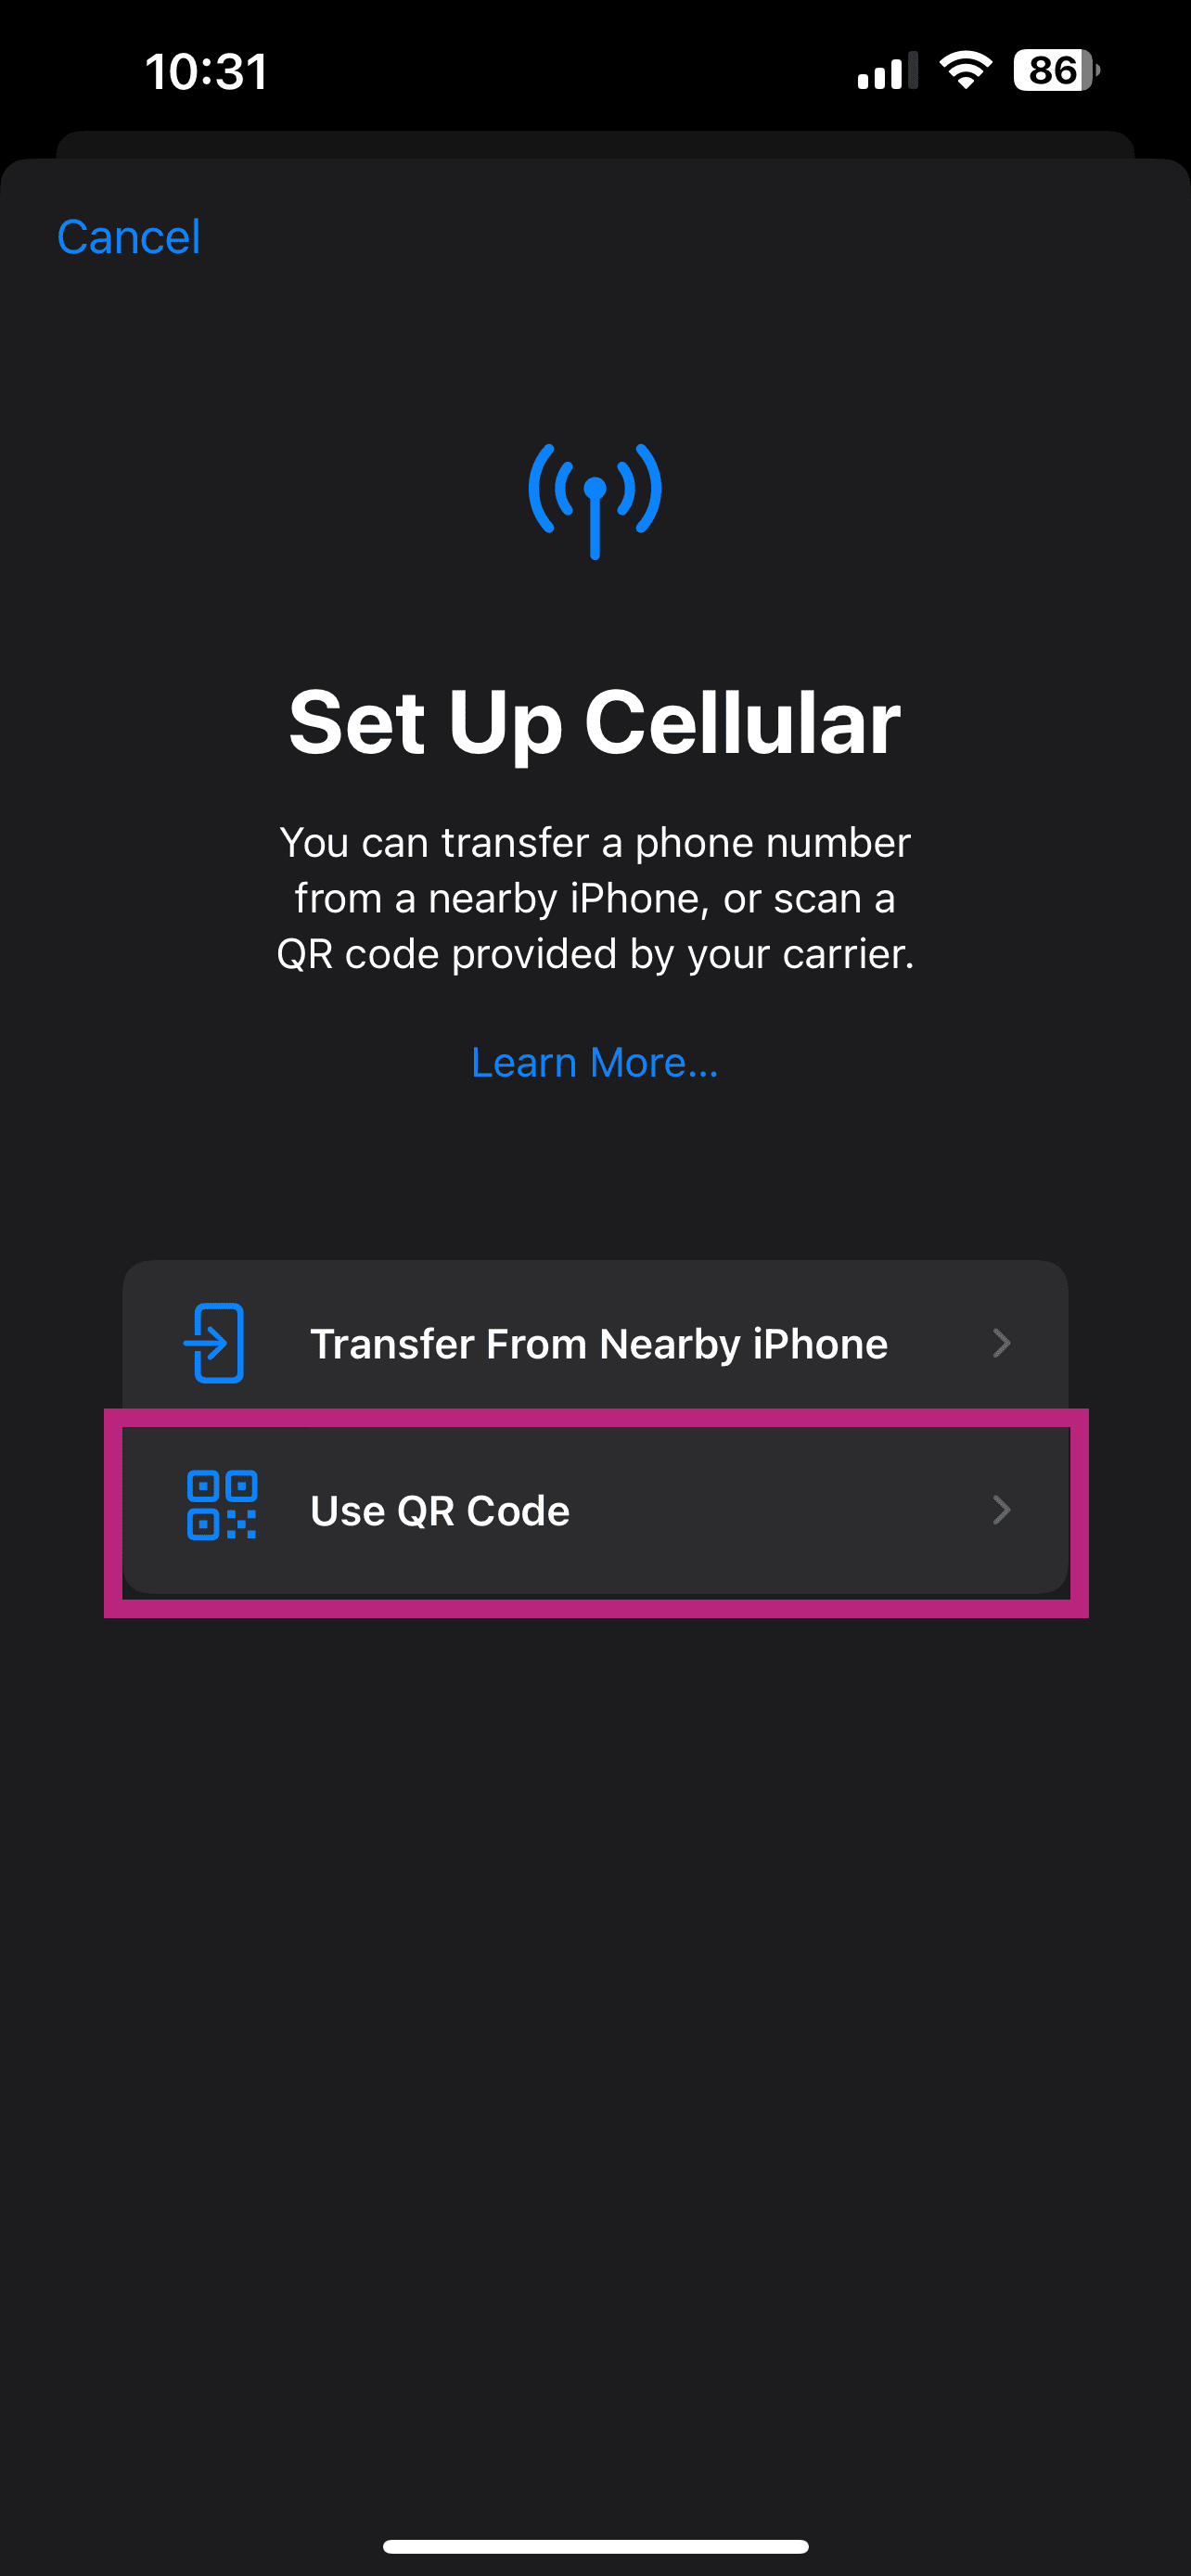
Use QR code
Tap "Use a QR code"
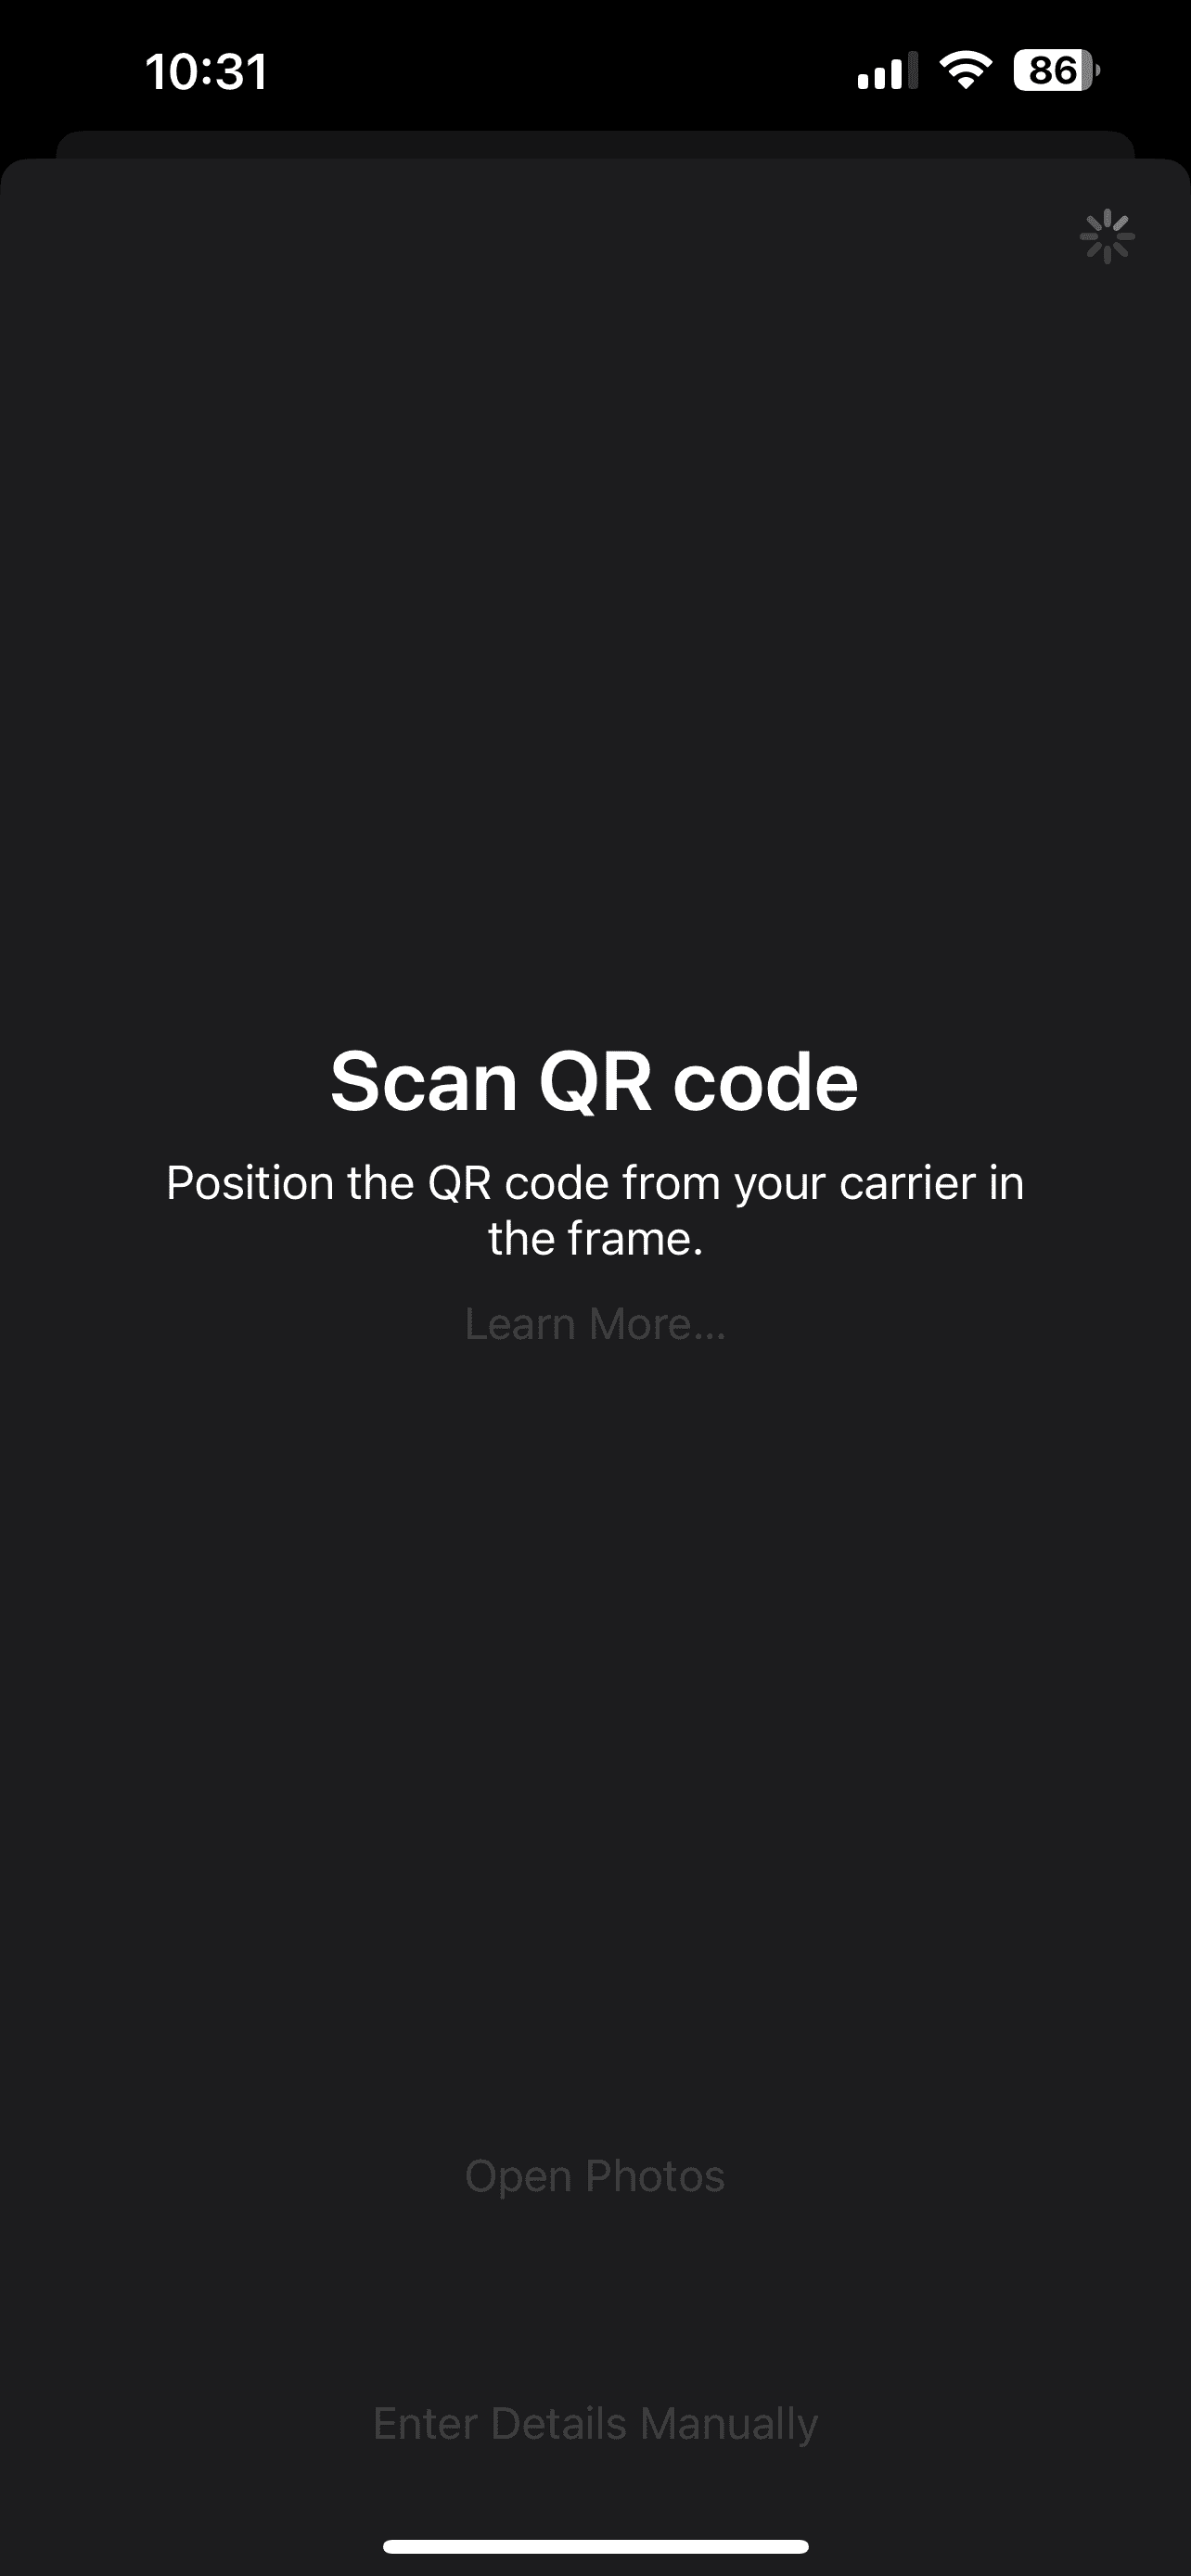
Scan QR code
Scan the QR code received by email or enter details of eSIM manually (if you can't scan)
Activate eSIM
After scanning the QR code, activate the eSIM by tapping continue

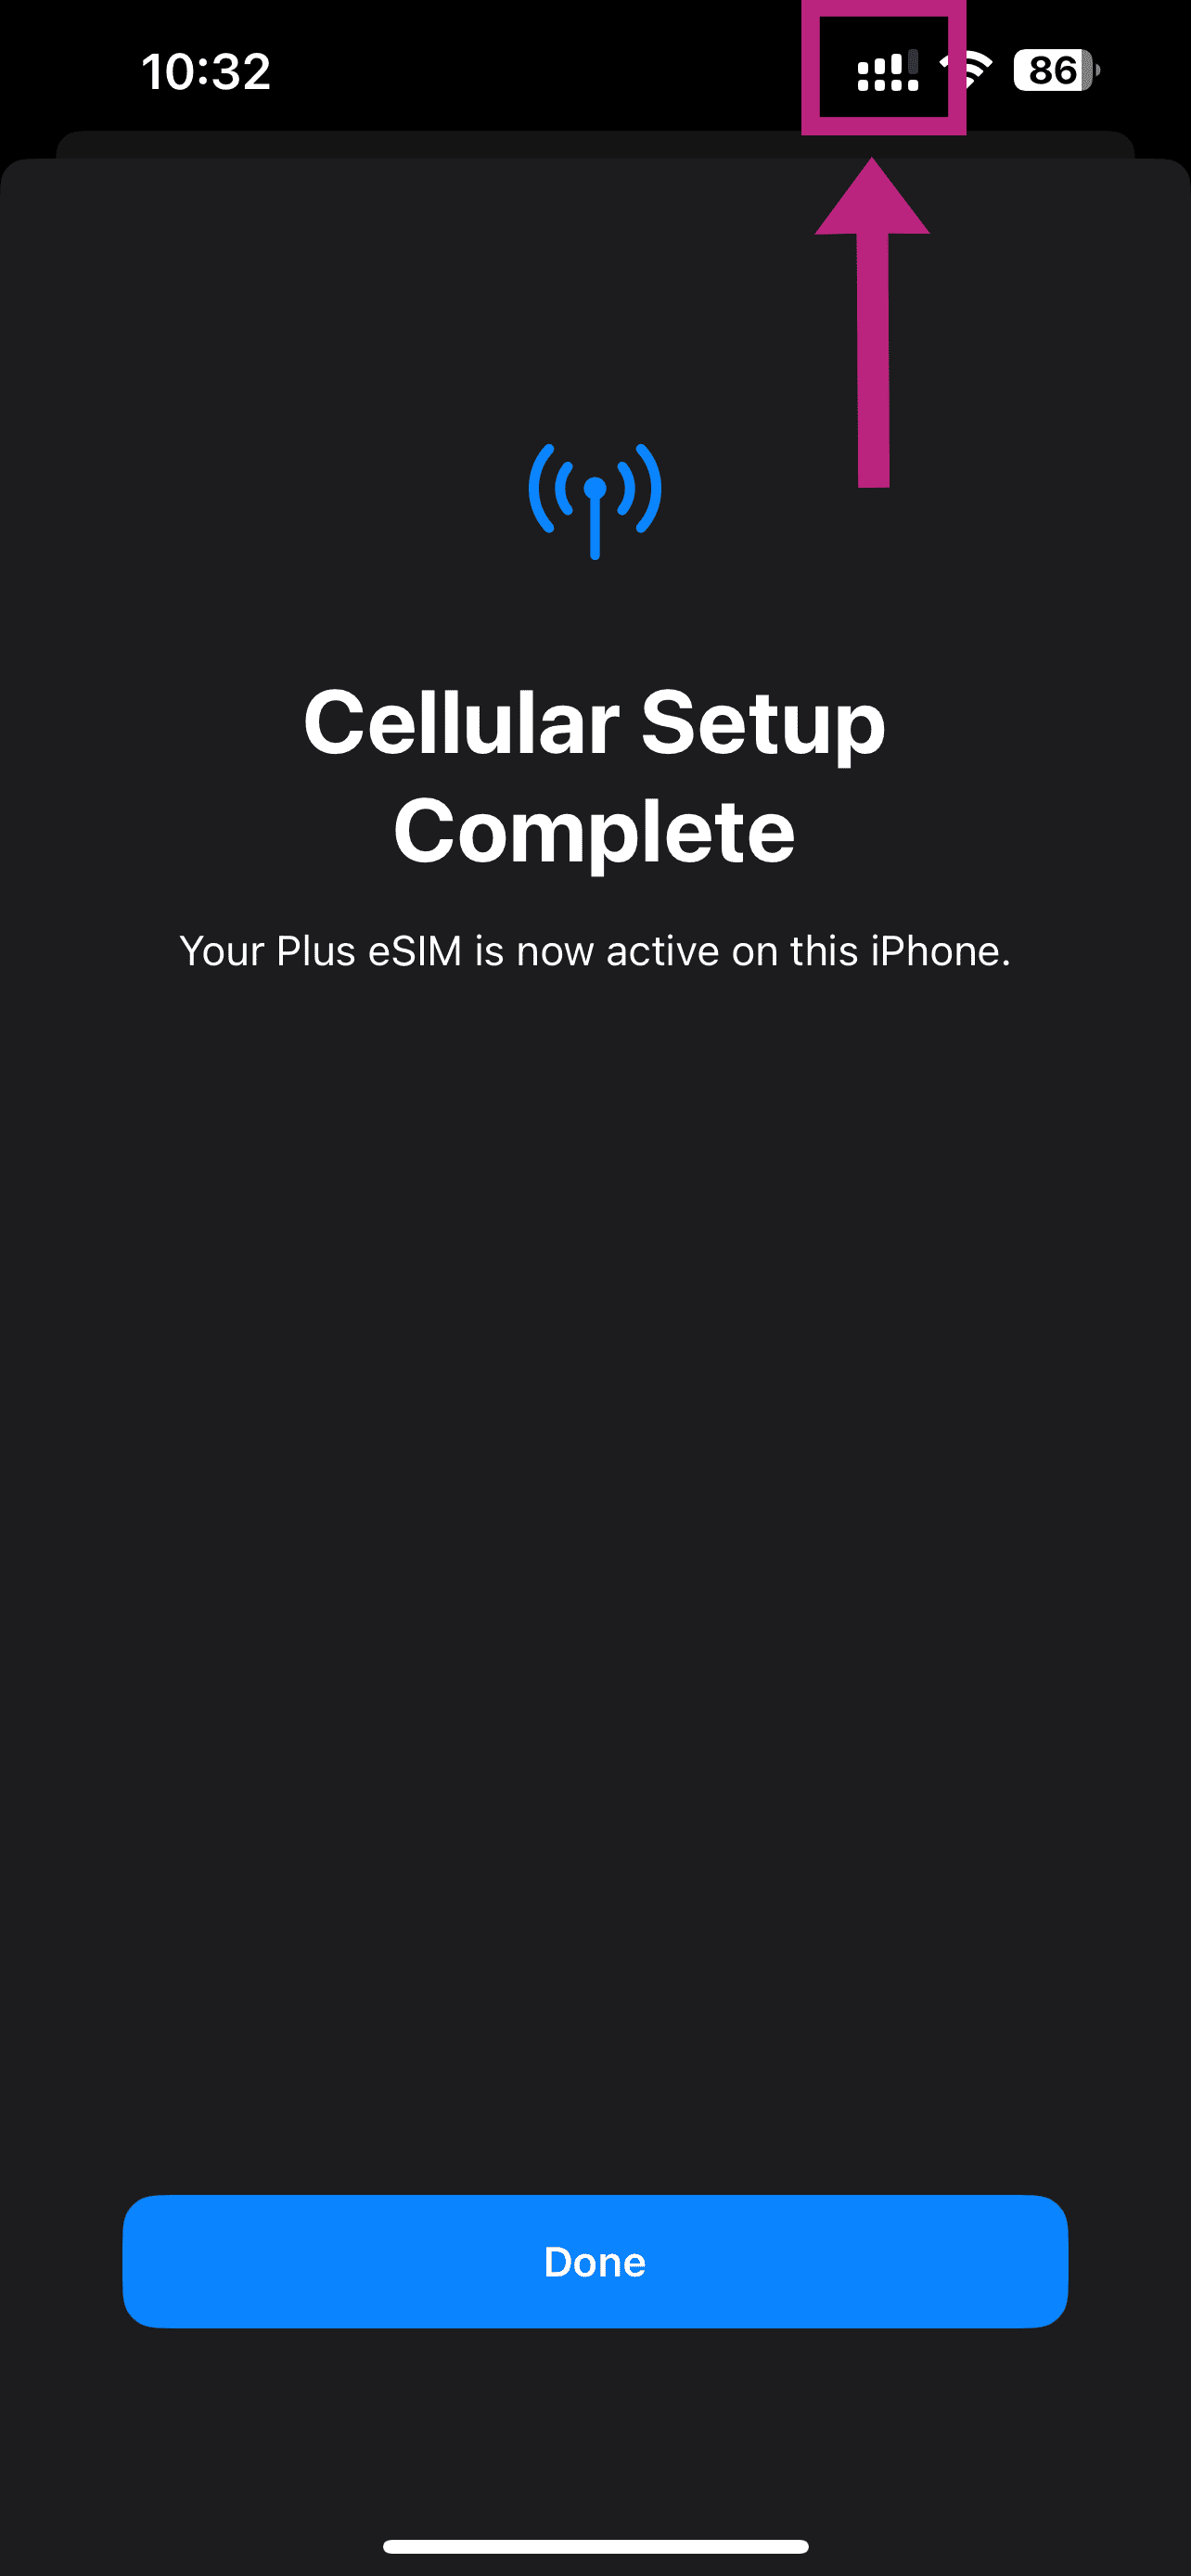
eSIM Activation completed
Activation of eSIM completed! Make sure you have 2 network signal bars on top
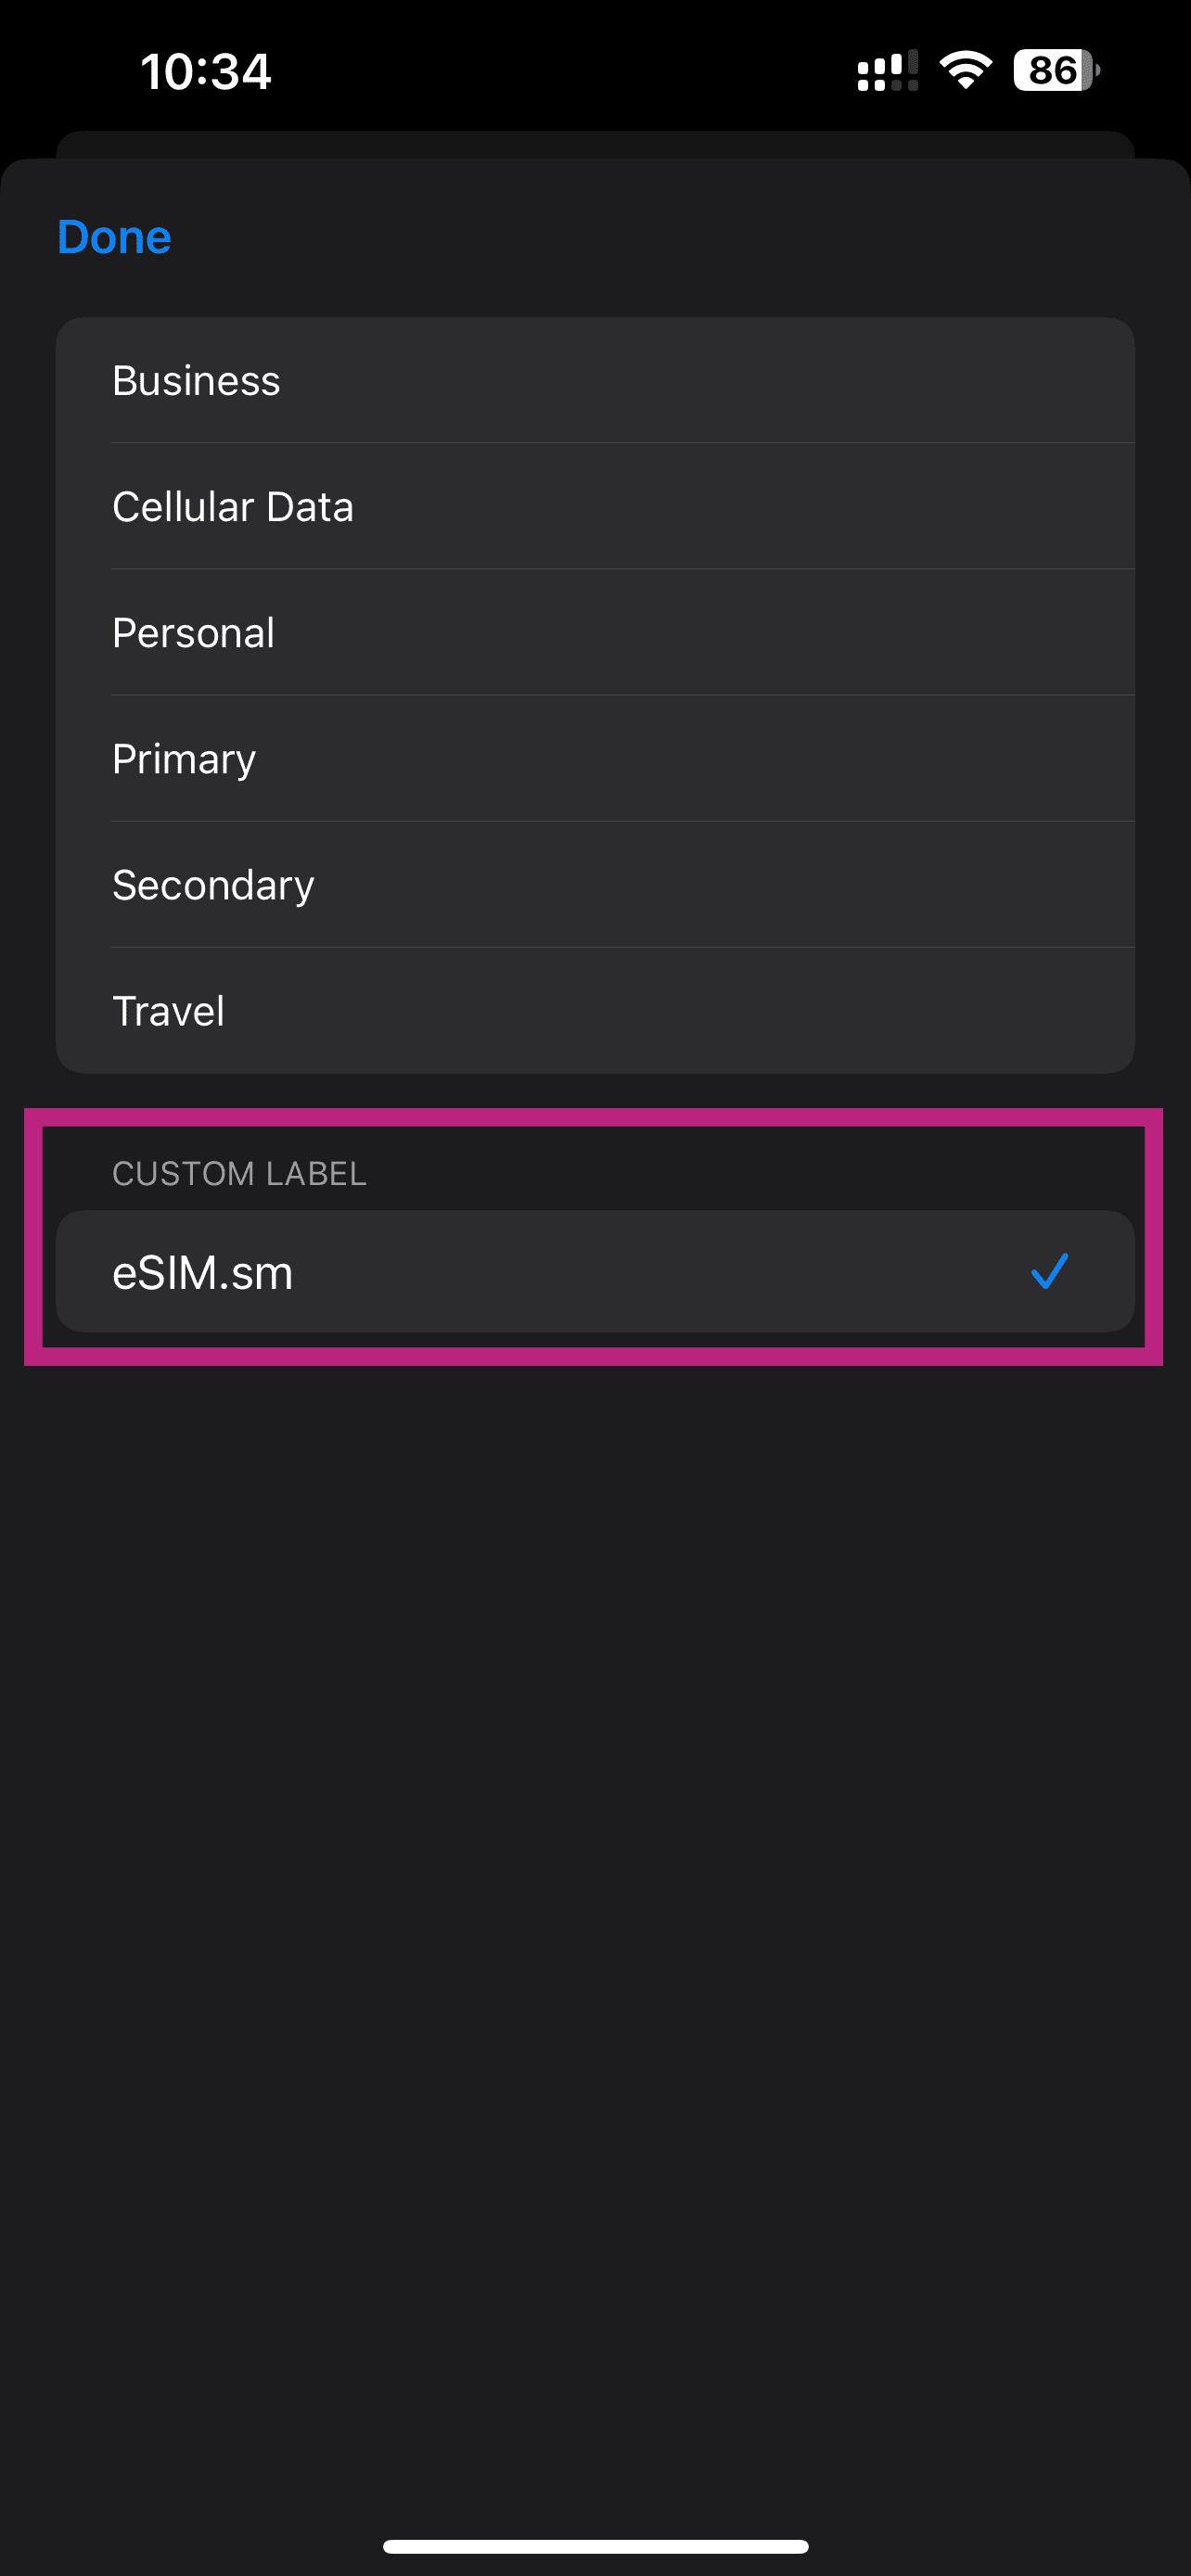
Select a label for your plan
Tap the new eSIM installed to rename it
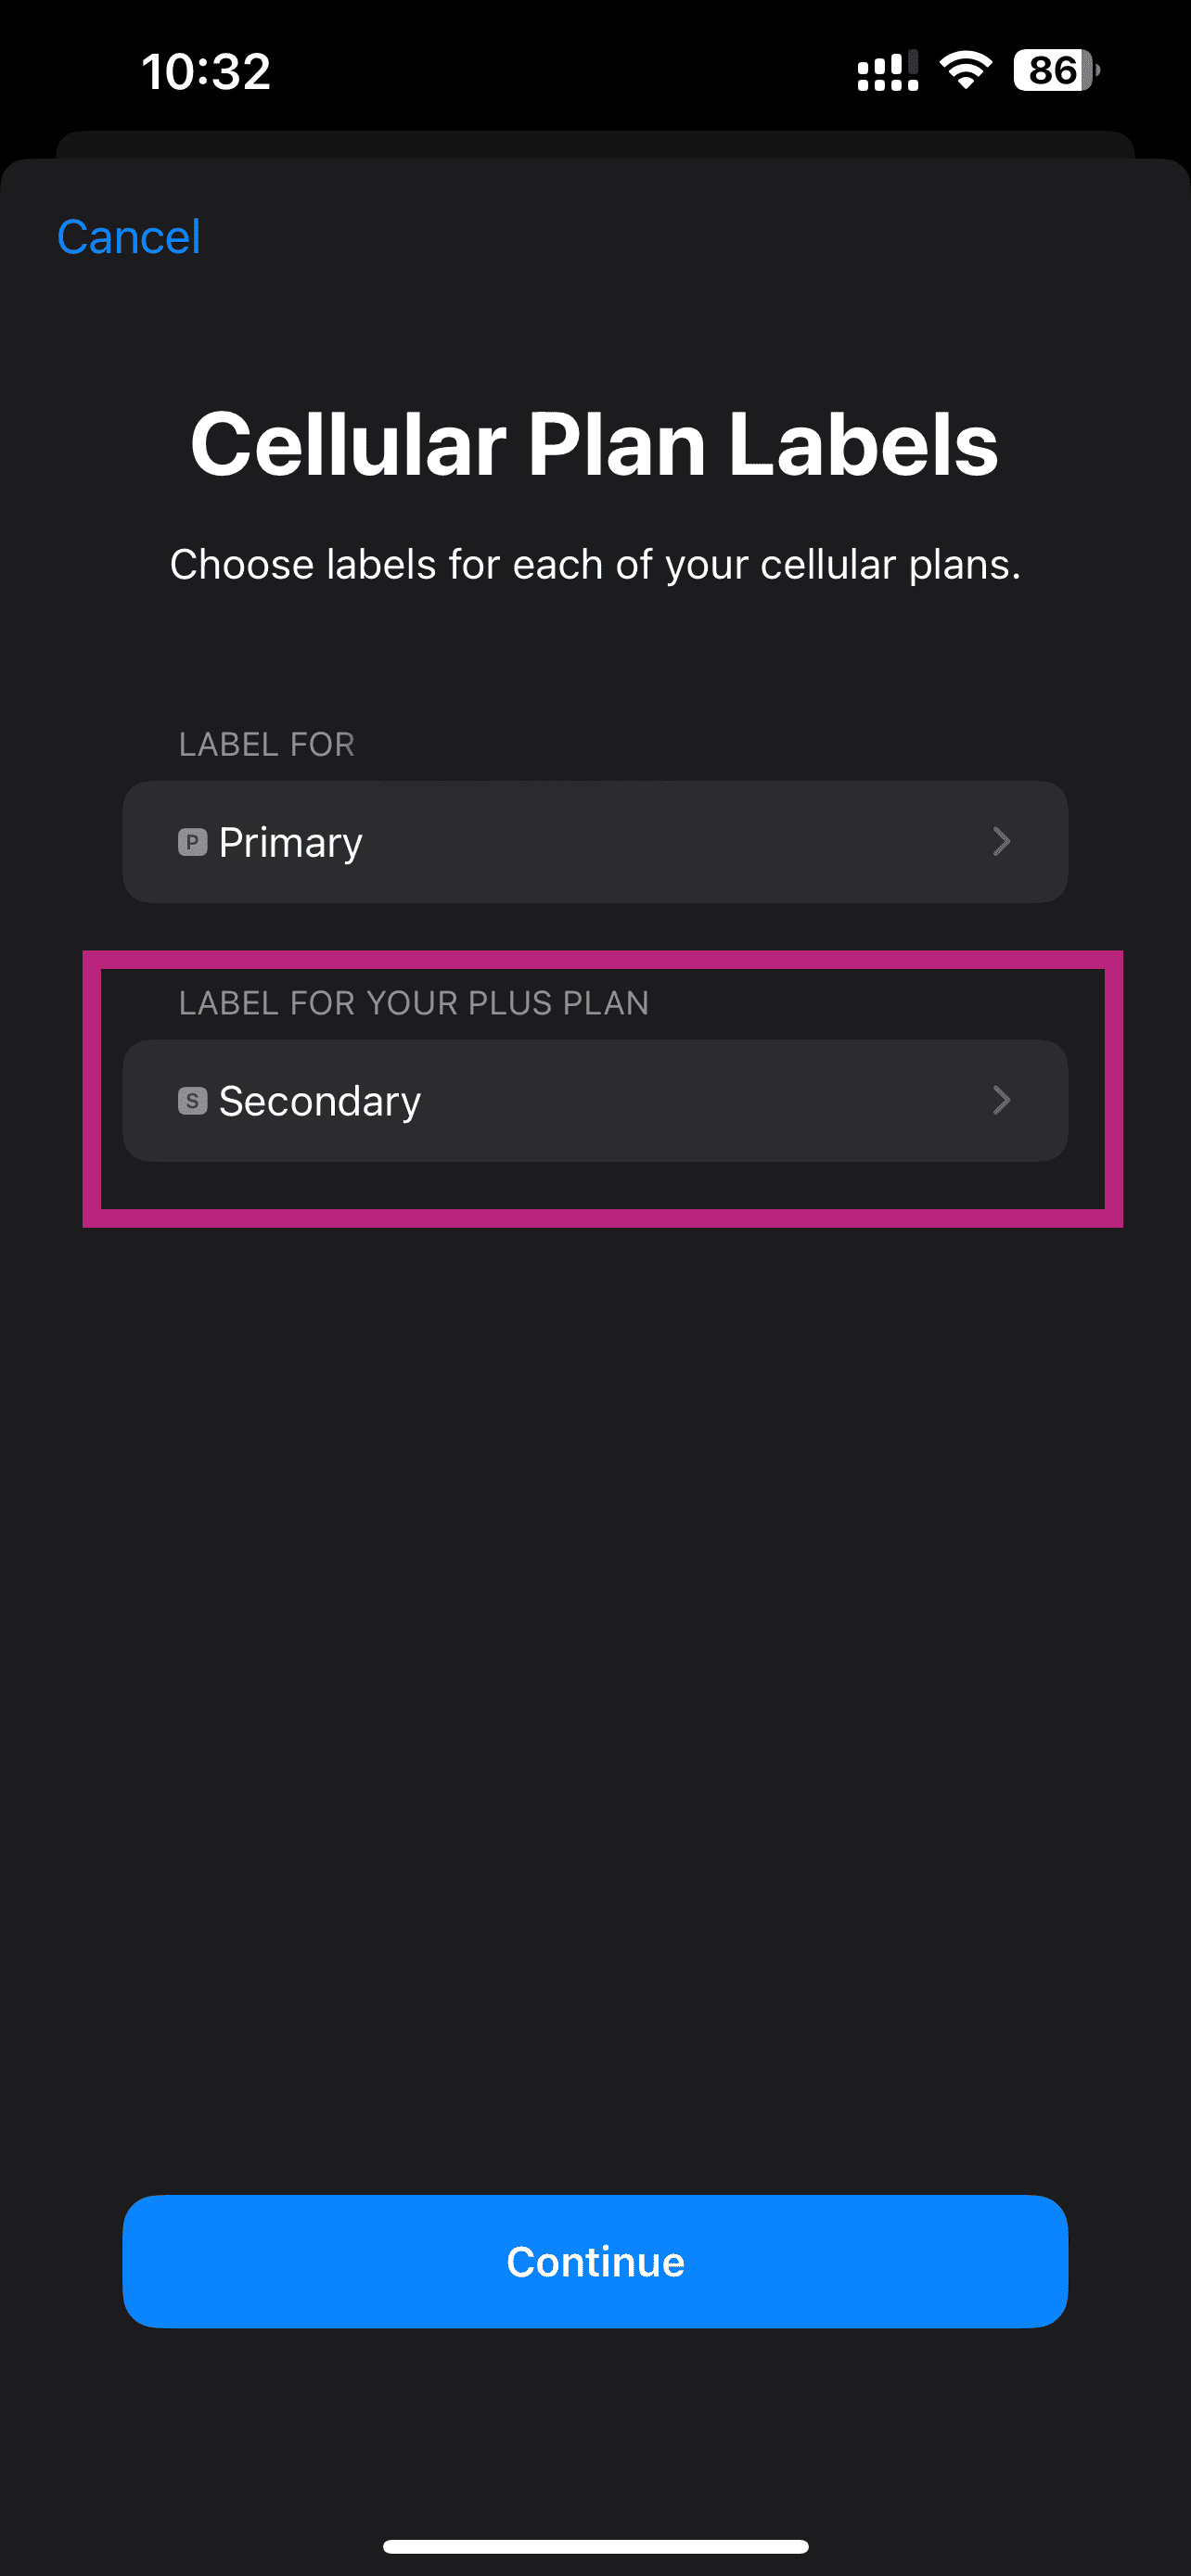
Customize the label of the eSIM
Rename it to eSIM.sm or your preferred name
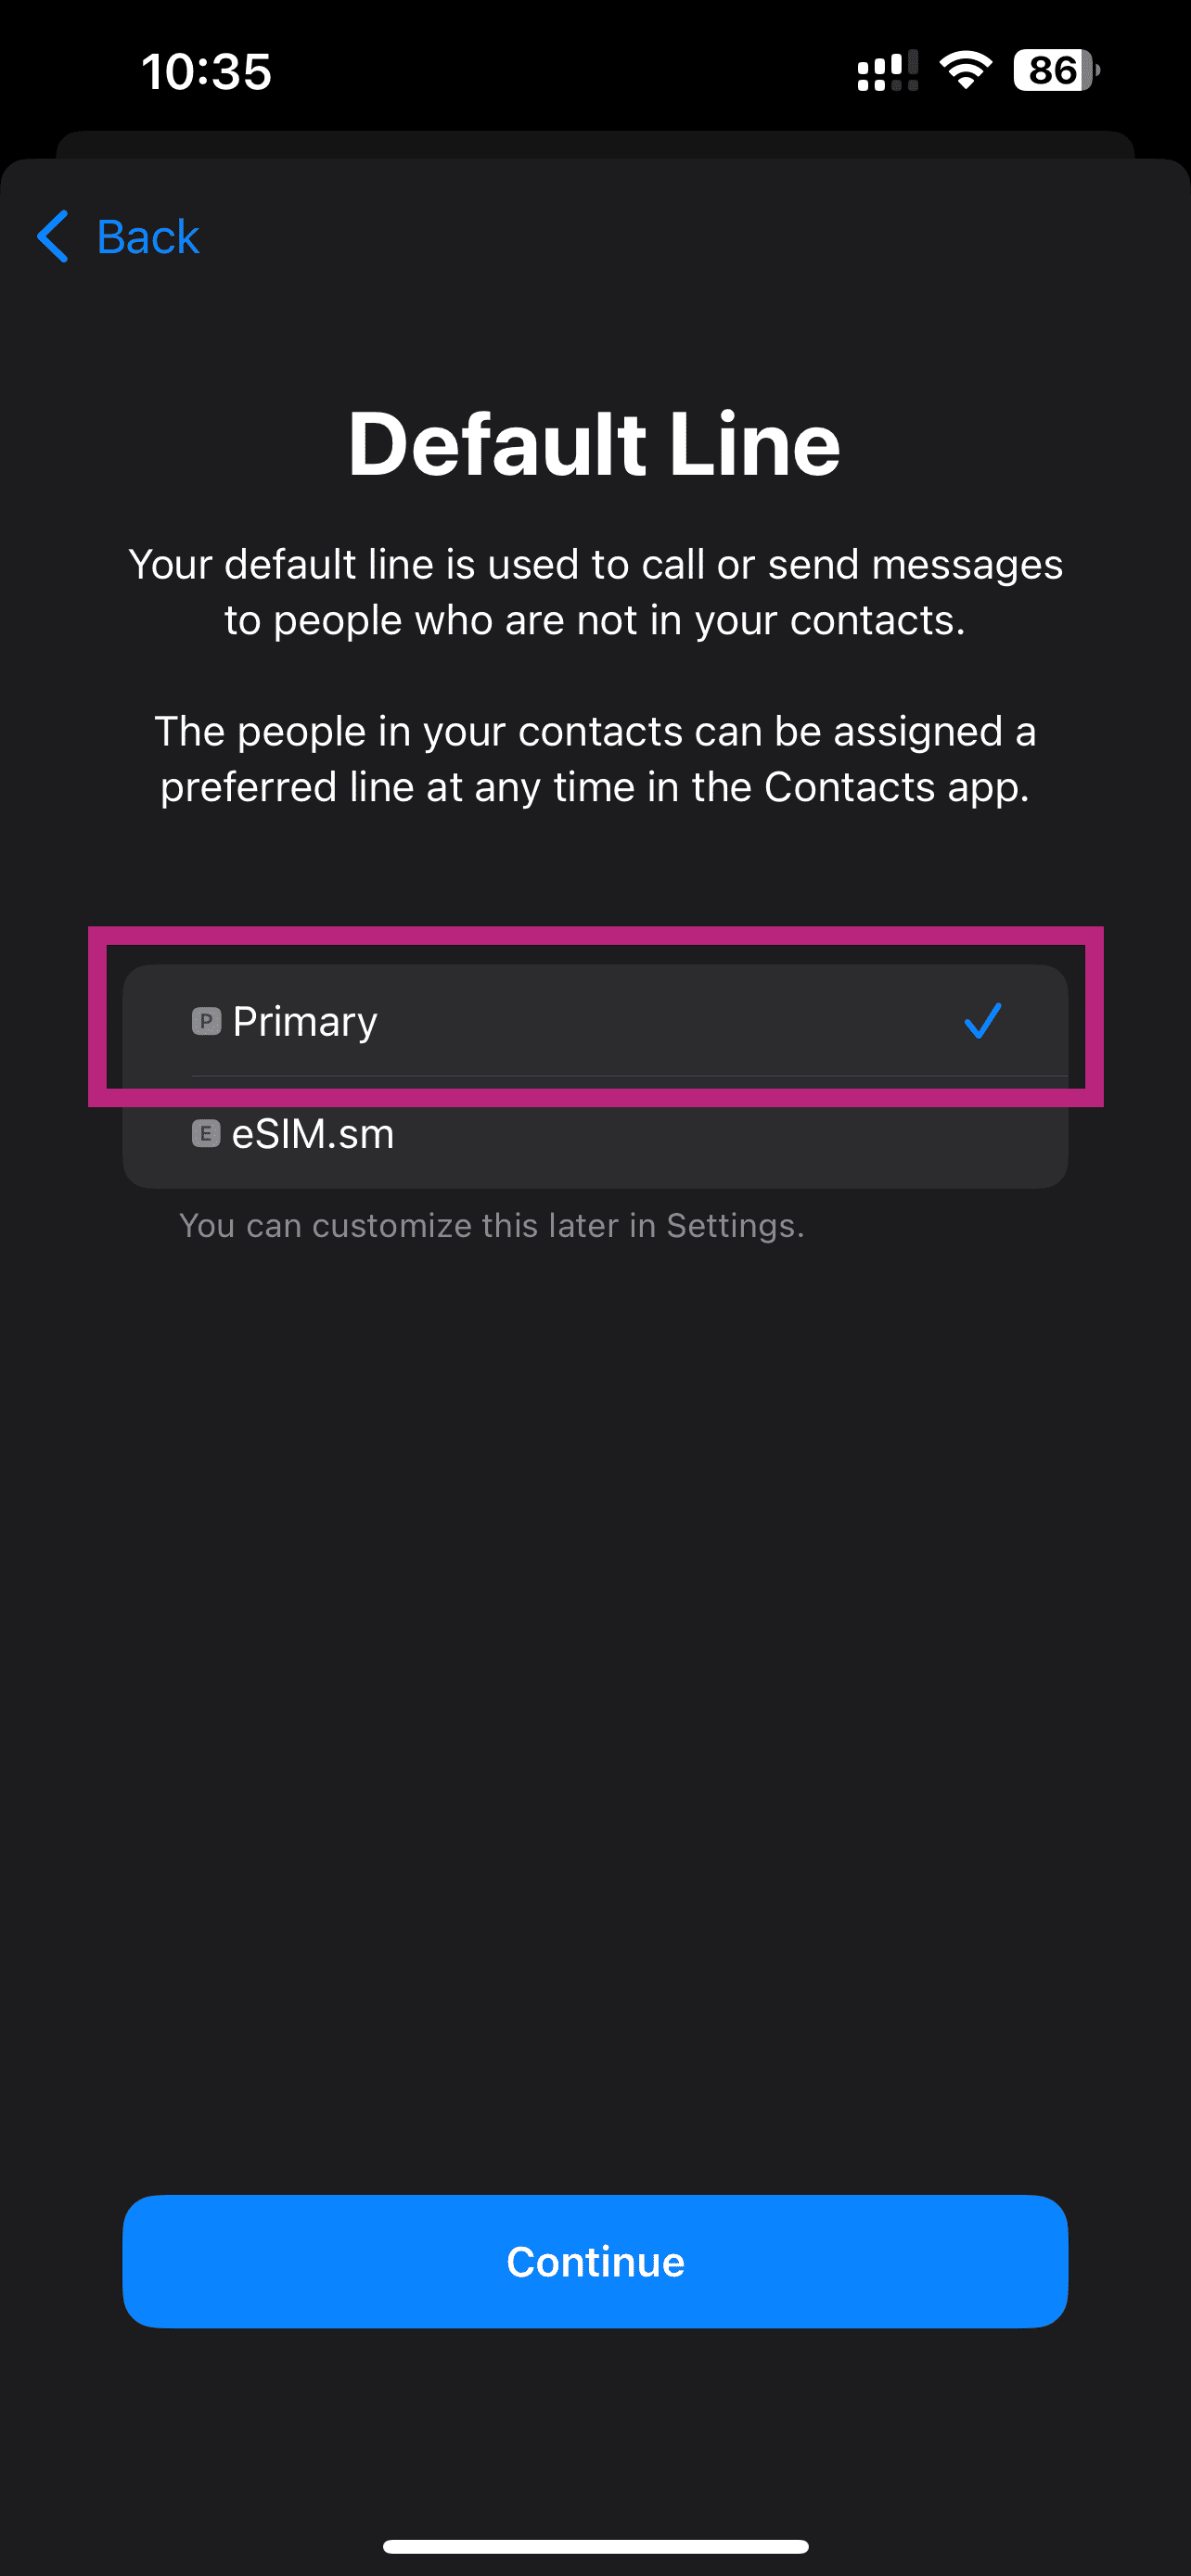
Set default phone line
Set your Primary SIM as Default Line
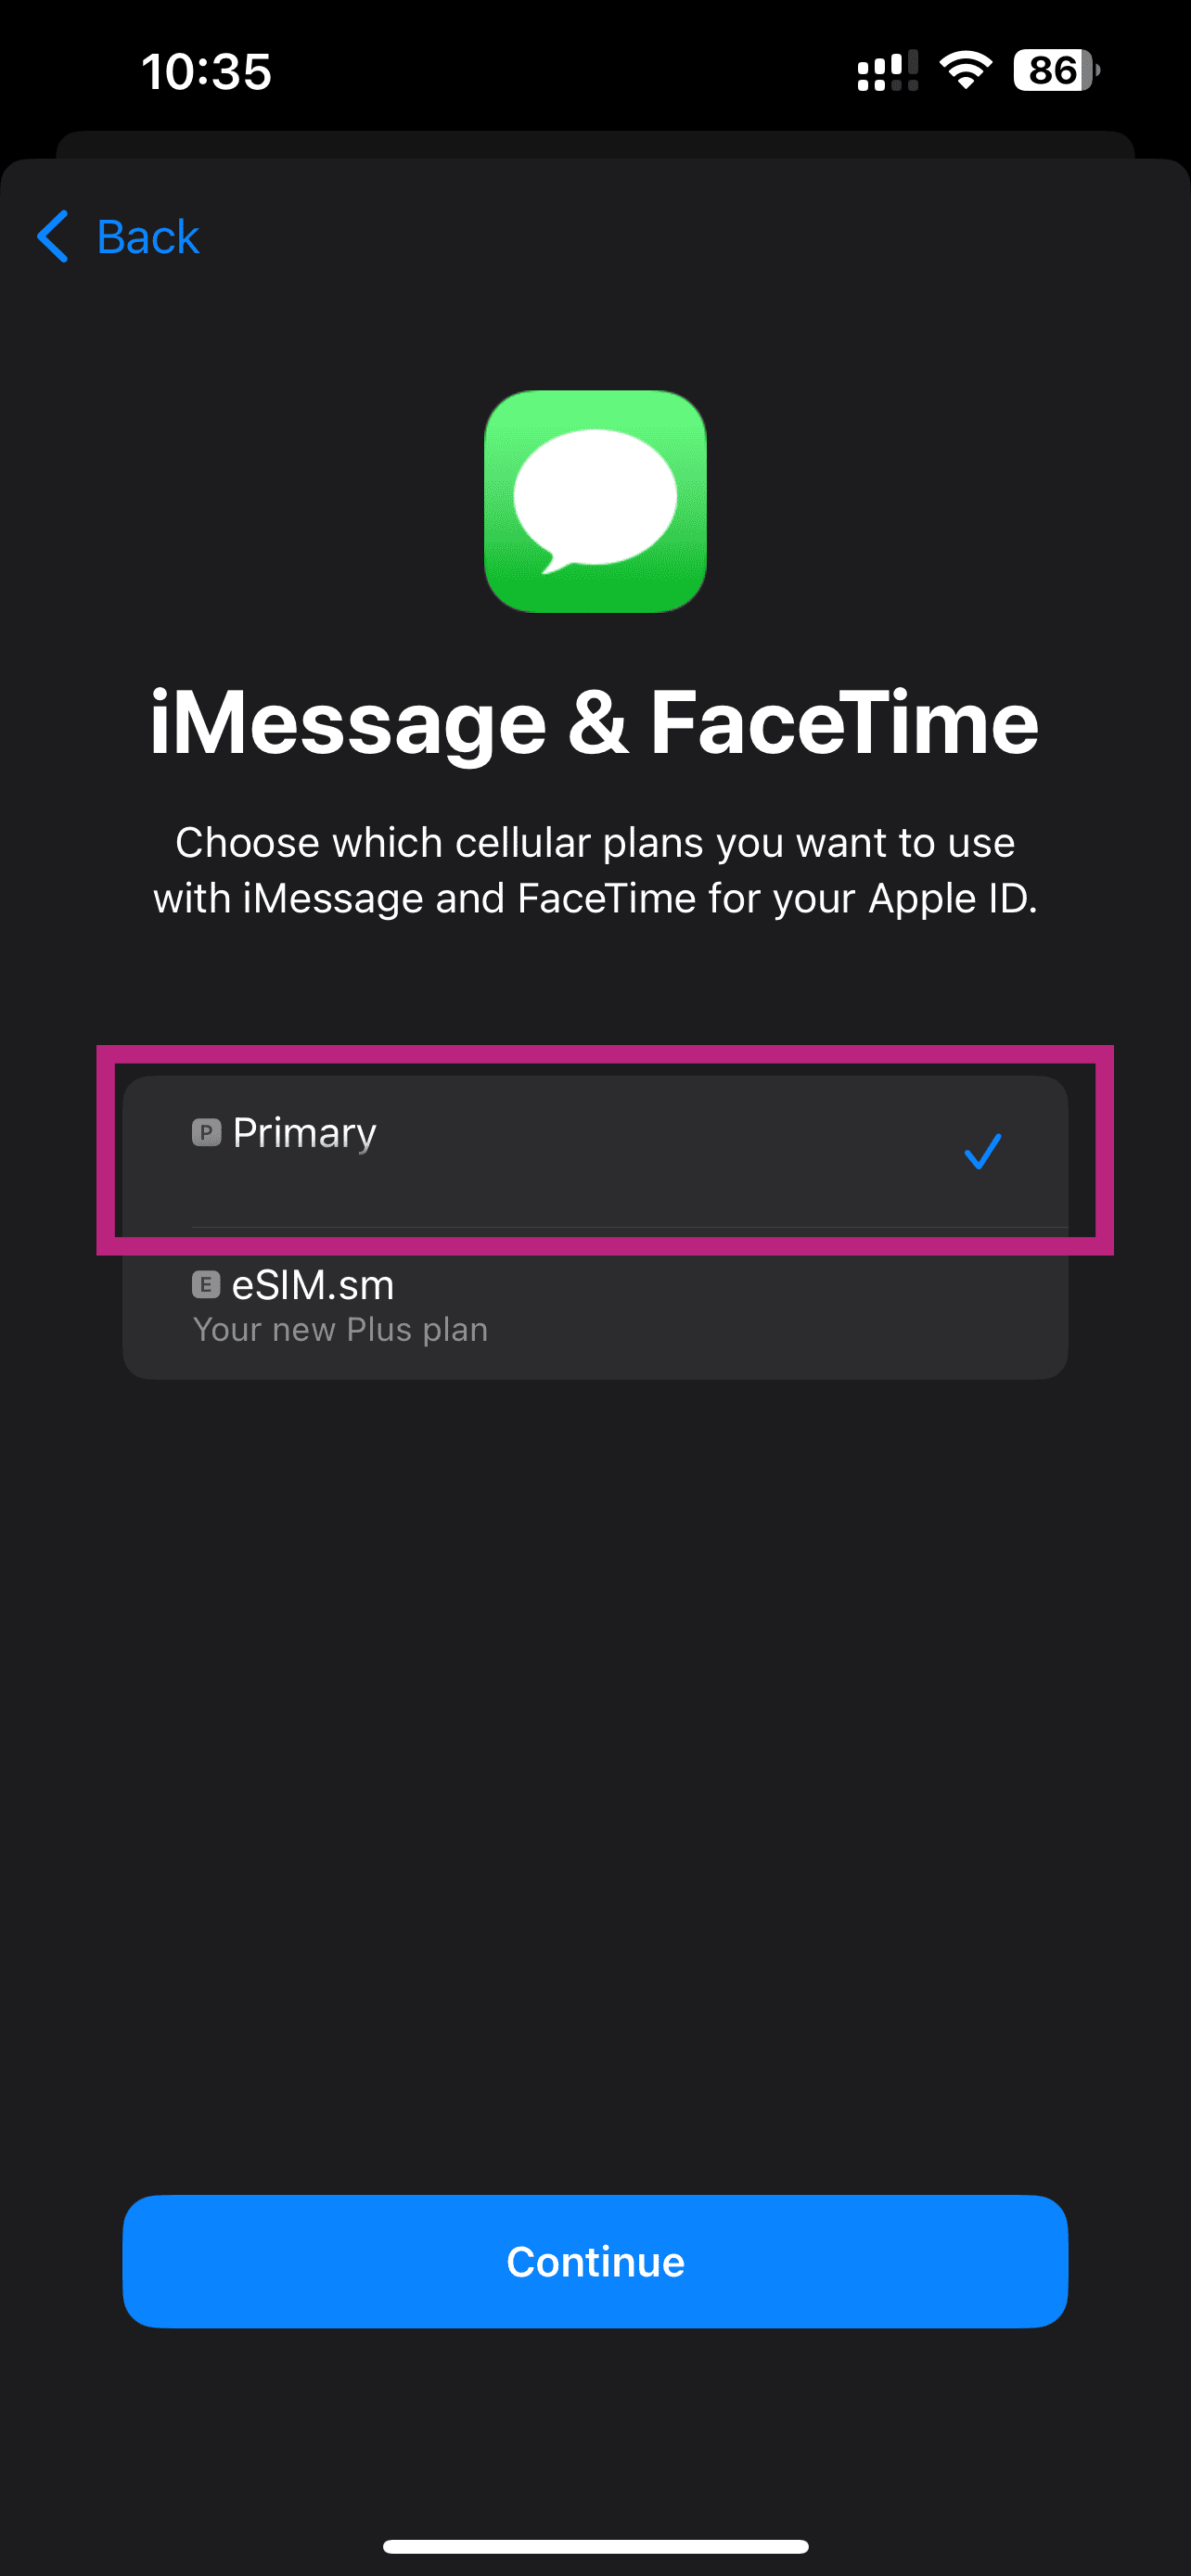
Set default line for iMessage and Facetime
Set your Primary SIM for iMessage & FaceTime
eSIM is installed
Go to Settings > Mobile Service/Cellular and make sure Cellular Data is set to your eSIM

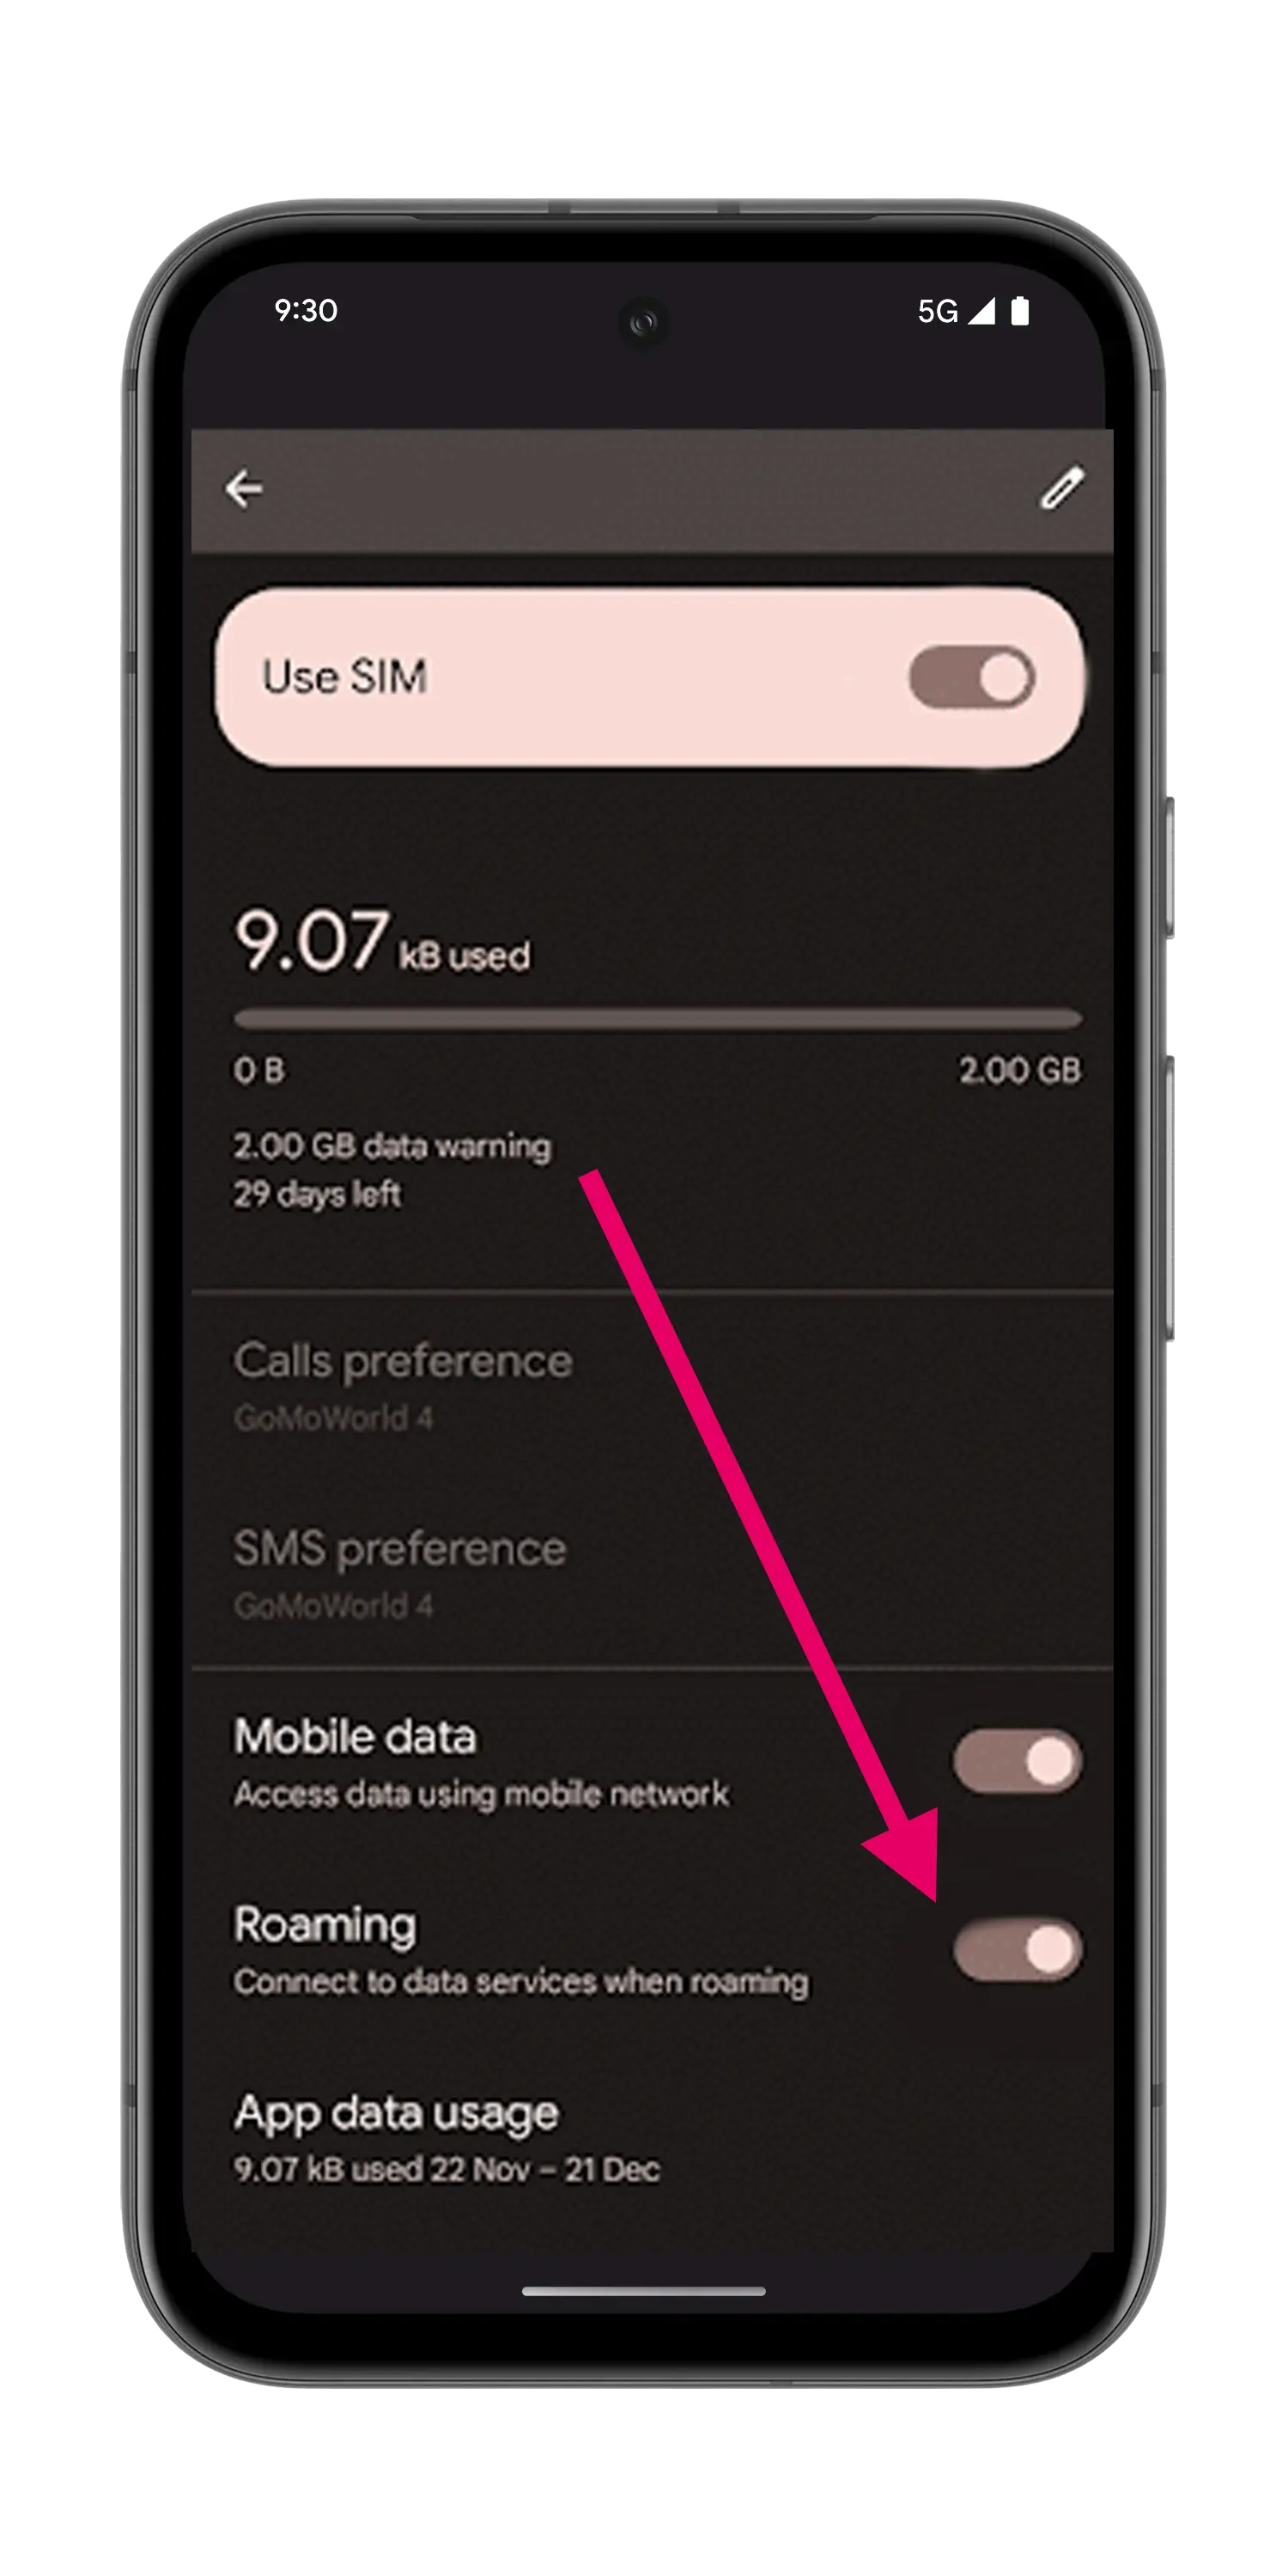
Enable roaming on eSIM
Enable data roaming on the new eSIM

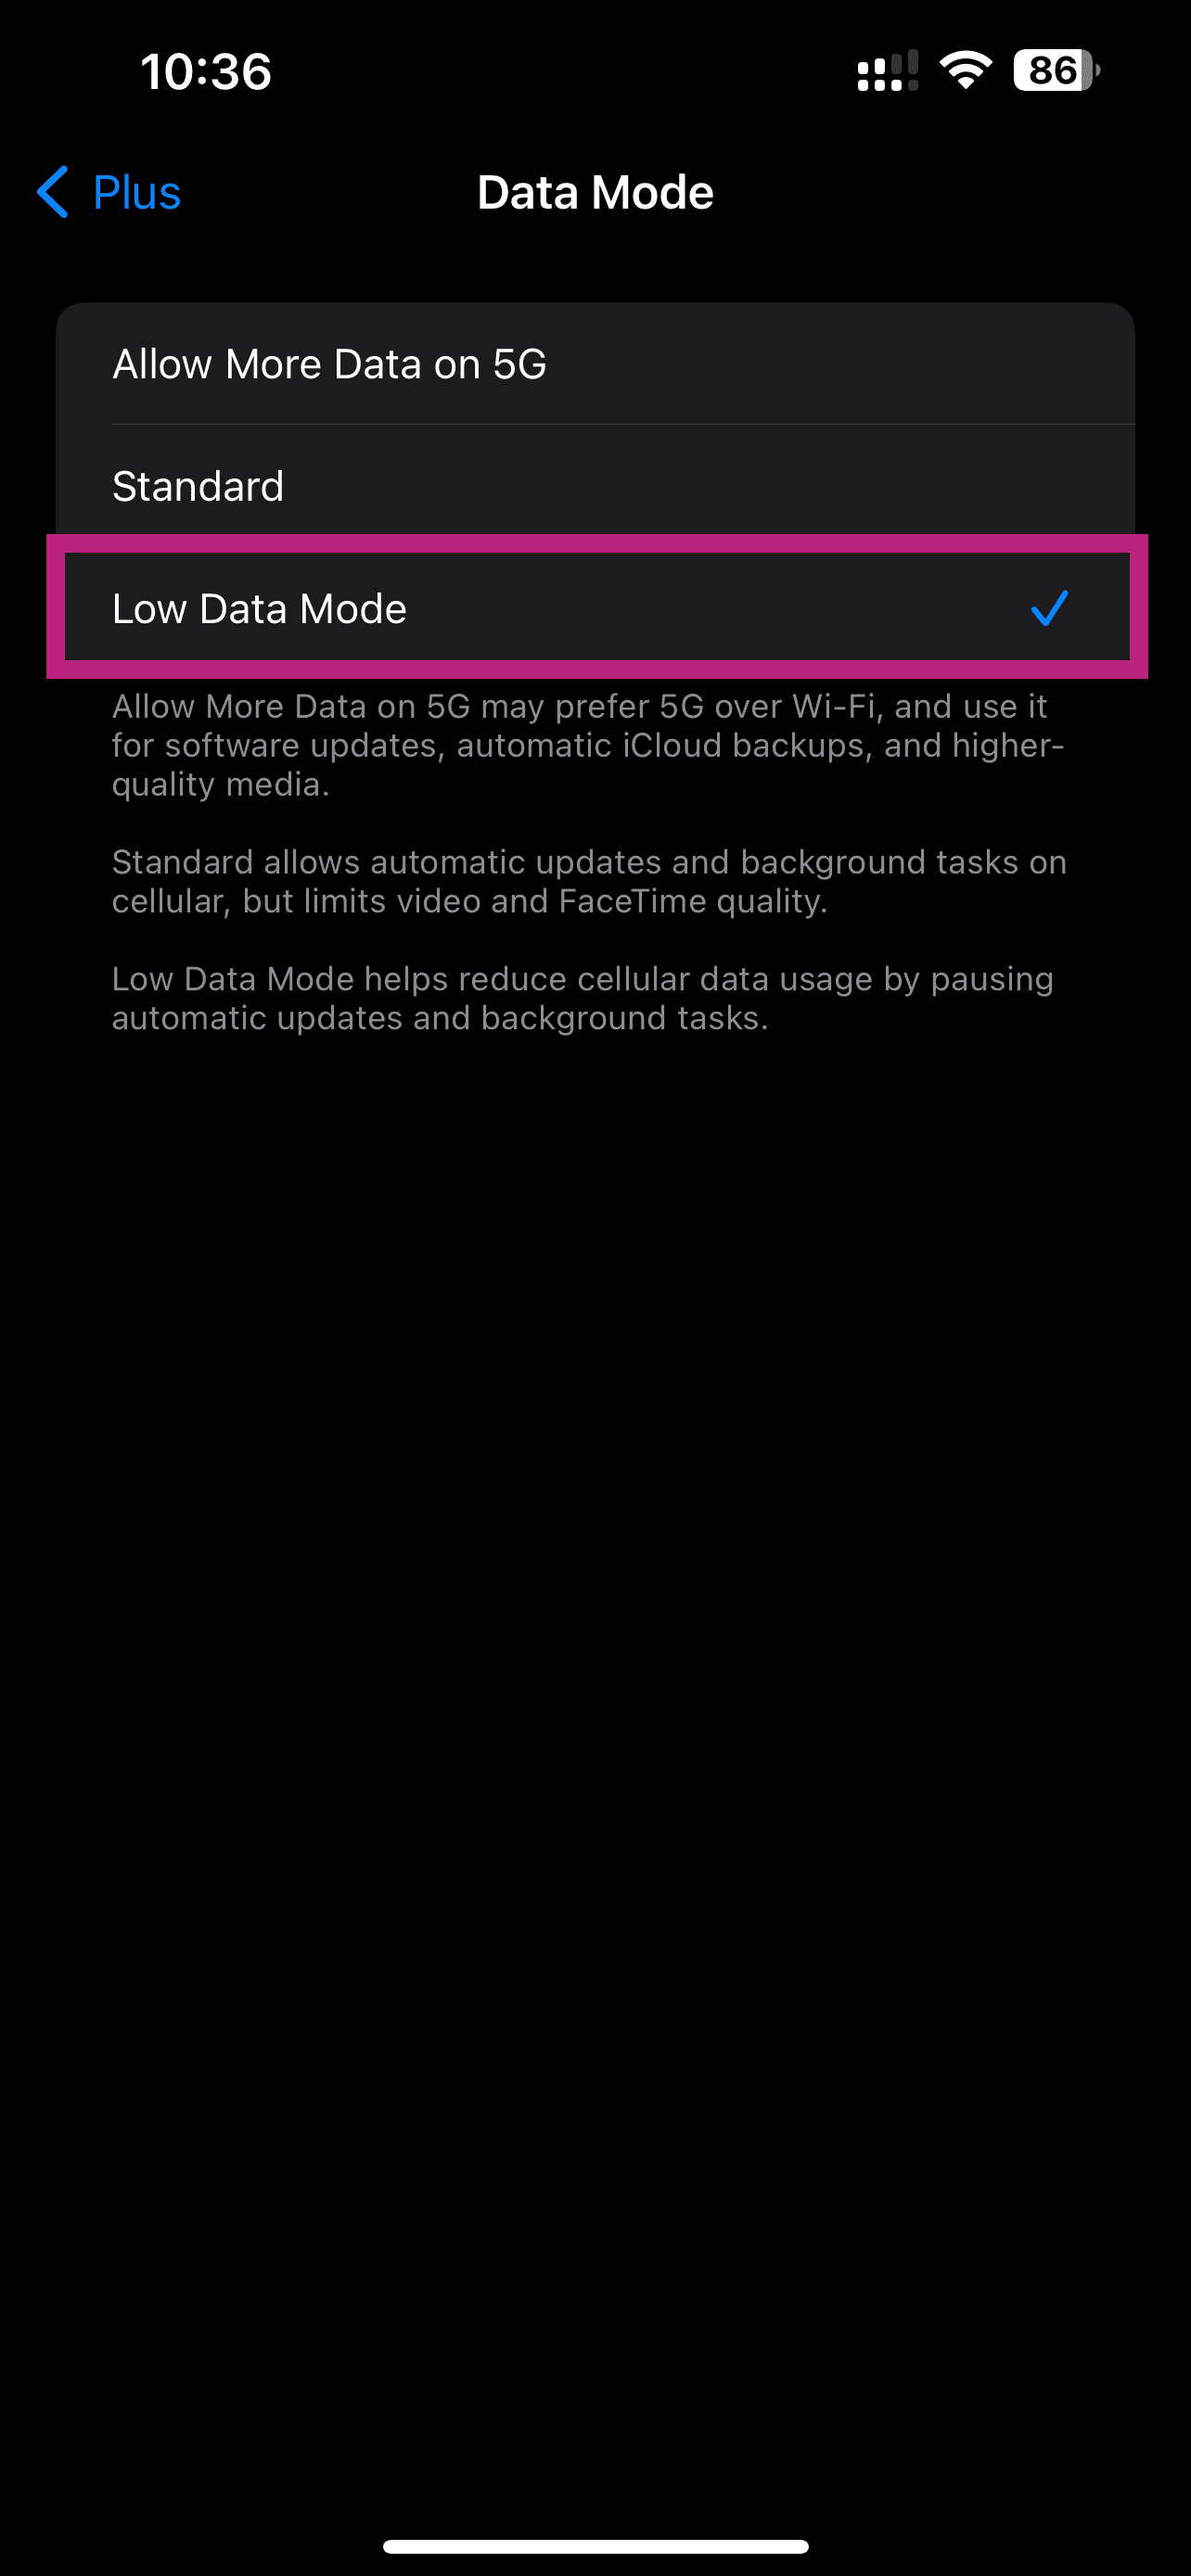
Enable low data mode on eSIM
Tap "Data Mode" and make sure "Low Data Mode" is selected
Manual iOS setup instructions
If you cannot scan the QR code, follow these manual setup instructions:
Access eSIM settings
- Go to Settings > Cellular/Mobile Data > Add eSIM or Set up Cellular/Mobile Service > Use QR Code on your device
- Tap "Enter Details Manually" and enter the SM-DP+ Address and Activation Code by copying them
- Tap "Next", then tap "Continue" twice and wait for a while
Complete setup
- Your eSIM will connect to the network, this may take a few minutes, then tap "Done"
- Choose a label for your new eSIM plan
- Choose "Primary" for your default line, then tap "Continue"
- Choose the "Primary" you want to use with iMessage and FaceTime for your Apple ID, then tap "Continue"
- Choose your new eSIM plan for cellular/mobile data, then tap "Continue"
Important Notes
• If you are not in the destination country, you need to select your primary SIM as "Cellular Data" and change it after you arrive at your destination
• We recommend installing the day before your trip and activating it once you arrive at your destination
General Tips
• Install the eSIM the day before your trip
• Only activate it for mobile data once you reach your destination
• Keep your primary SIM for calls and messages
• Make sure data roaming is enabled on your eSIM
Samsung
Samsung devices offer straightforward eSIM installation. Follow these steps to set up your eSIM on your Samsung Galaxy device.
What You Need
• A Samsung phone compatible with eSIM technology
• The installation email with QR code
• Stable internet connection
QR Code Installation
Follow these steps to install your eSIM using the QR code method.
Installation Steps
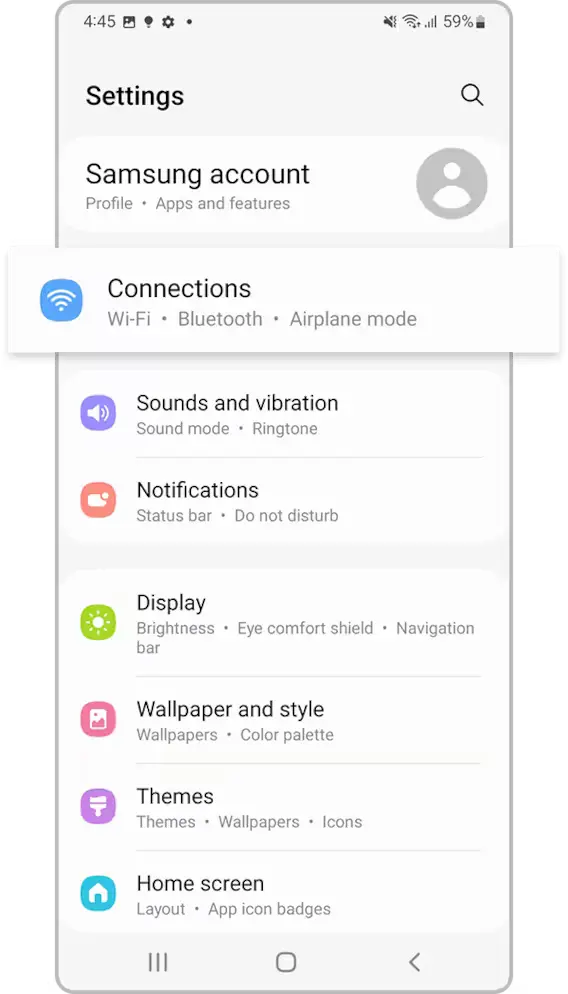
Access Connections
Go to Settings > Connection
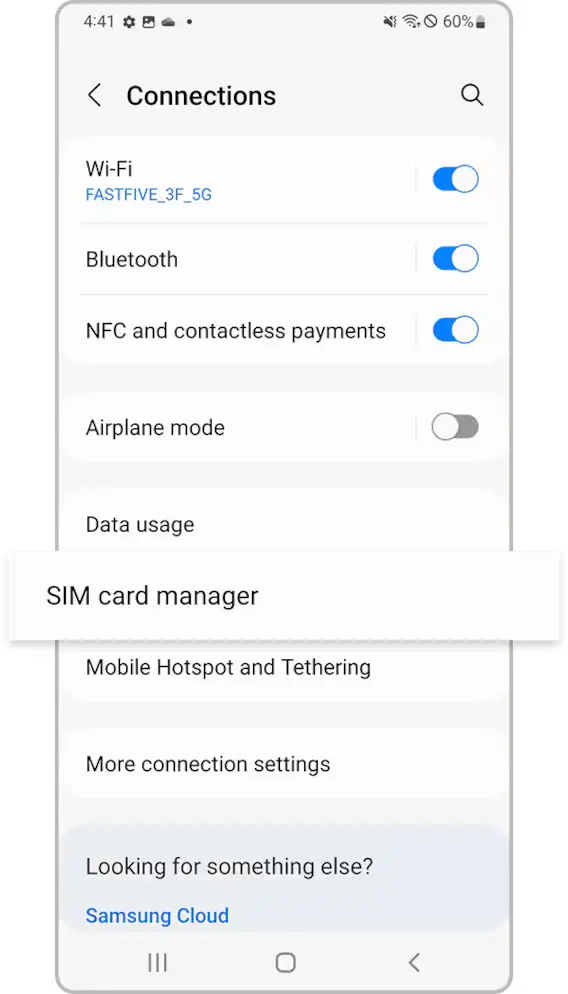
Open SIM manager
Tap on "SIM manager"
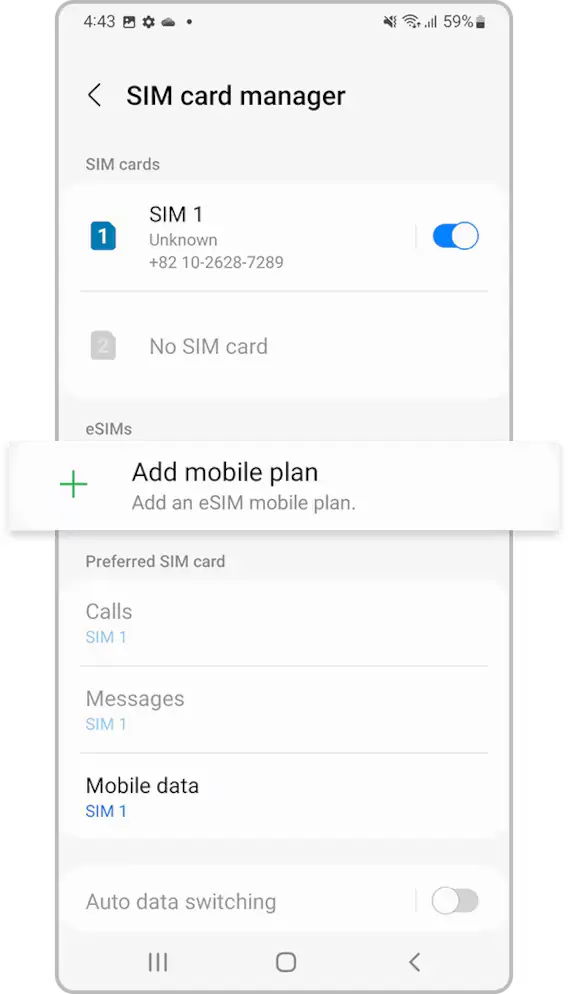
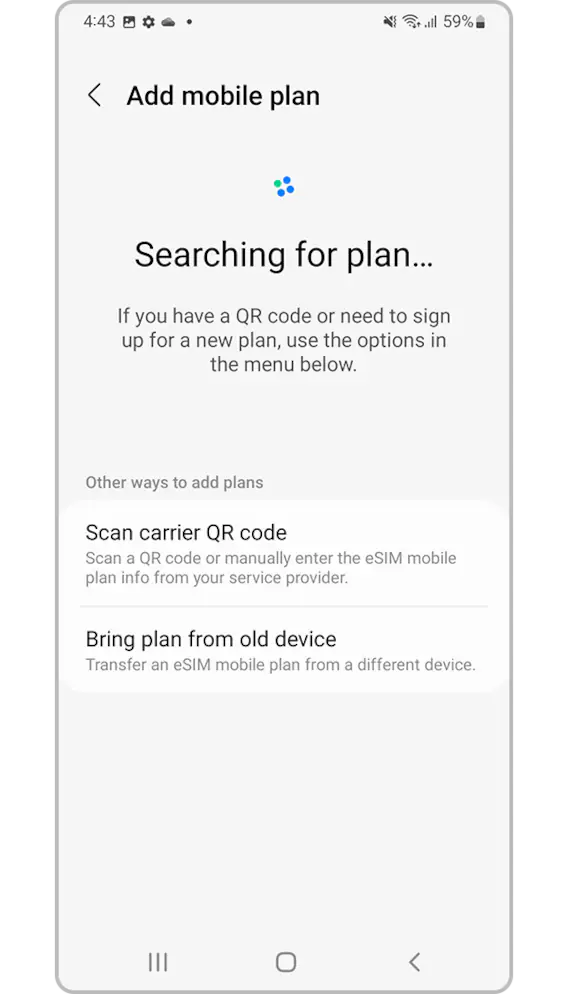
Add eSIM
Tap "Add eSIM/Mobile plan"
Scan QR Code
Click "Scan QR Code" and scan your installation QR code
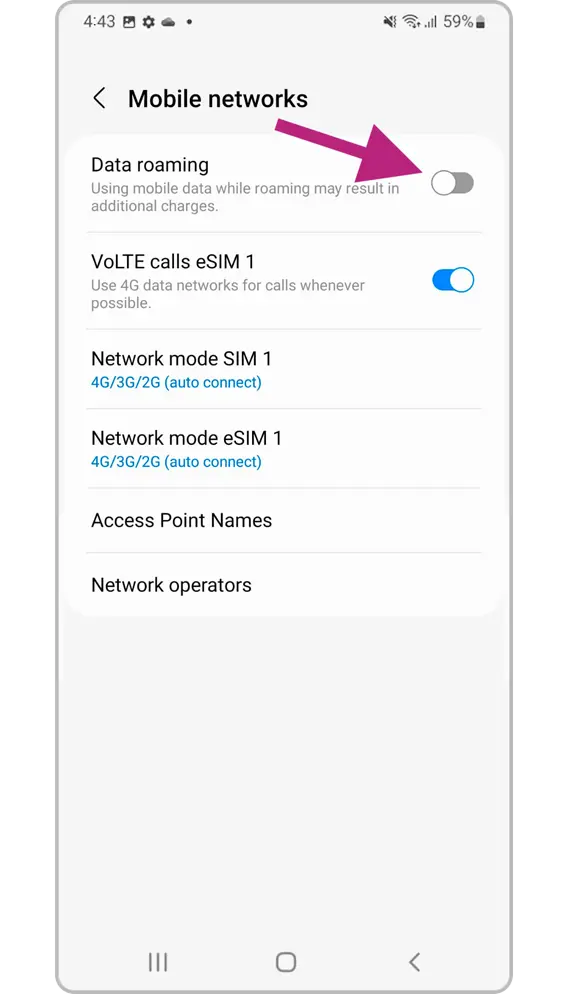
Enable Data Roaming
Make sure you have data roaming enabled!!
Samsung Manual setup instructions
If you cannot scan the QR code, follow these manual setup instructions:
Manual setup process
- Go to "Settings", tap "Connections", then tap "SIM card manager" on your device
- Tap "Add mobile plan", then tap "Scan carrier QR code"
- Tap "Enter activation code"
- Enter the SM-DP+ Address & Activation Code by copying it, tap "Connect", then tap "Confirm"
Important Notes
• Make sure you have data roaming enabled after installation
• Your eSIM should be set for mobile data while calls remain on your main line
General Tips
• Install the day before your trip
• Activate by selecting the eSIM for mobile data once at destination
• Ensure data roaming is enabled
• Keep your primary SIM for calls and messages
Google Pixel
Google Pixel devices have native eSIM support. Follow these simple steps to install your eSIM on your Pixel device.
What You Need
• A Google Pixel phone compatible with eSIM technology
• The installation email with QR code
• Stable internet connection
QR Code Installation
Use this method to install your eSIM using the QR code from your installation email.
Installation Steps
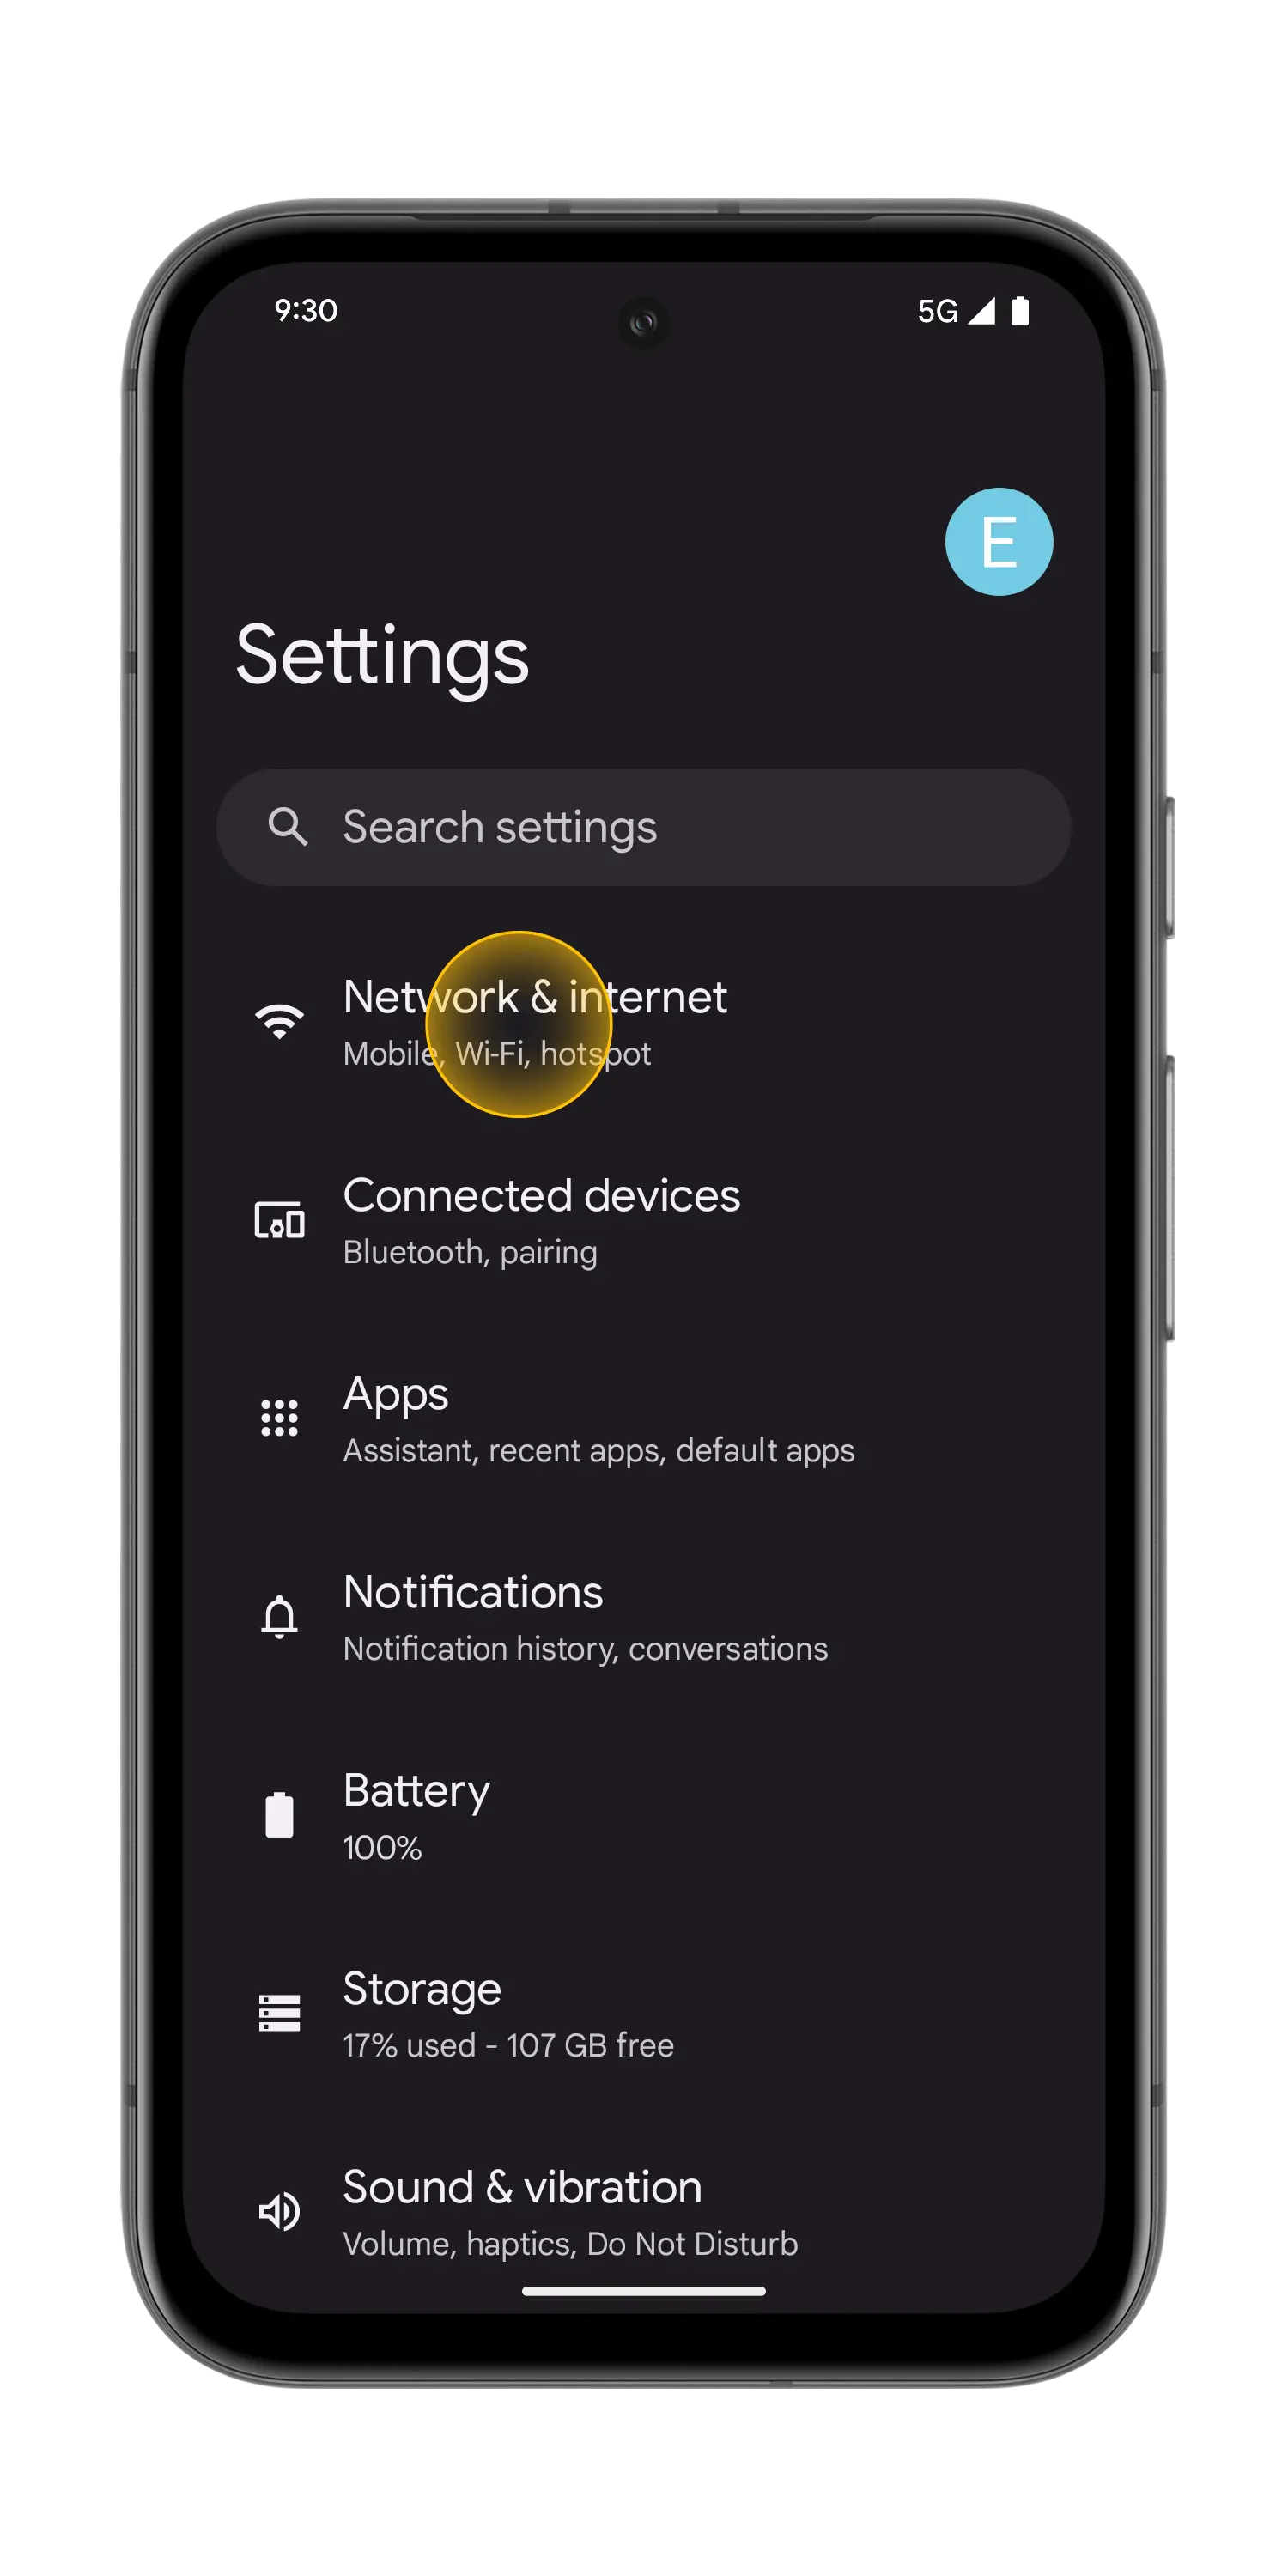
Access Network Settings
Go to Settings > Network & Internet
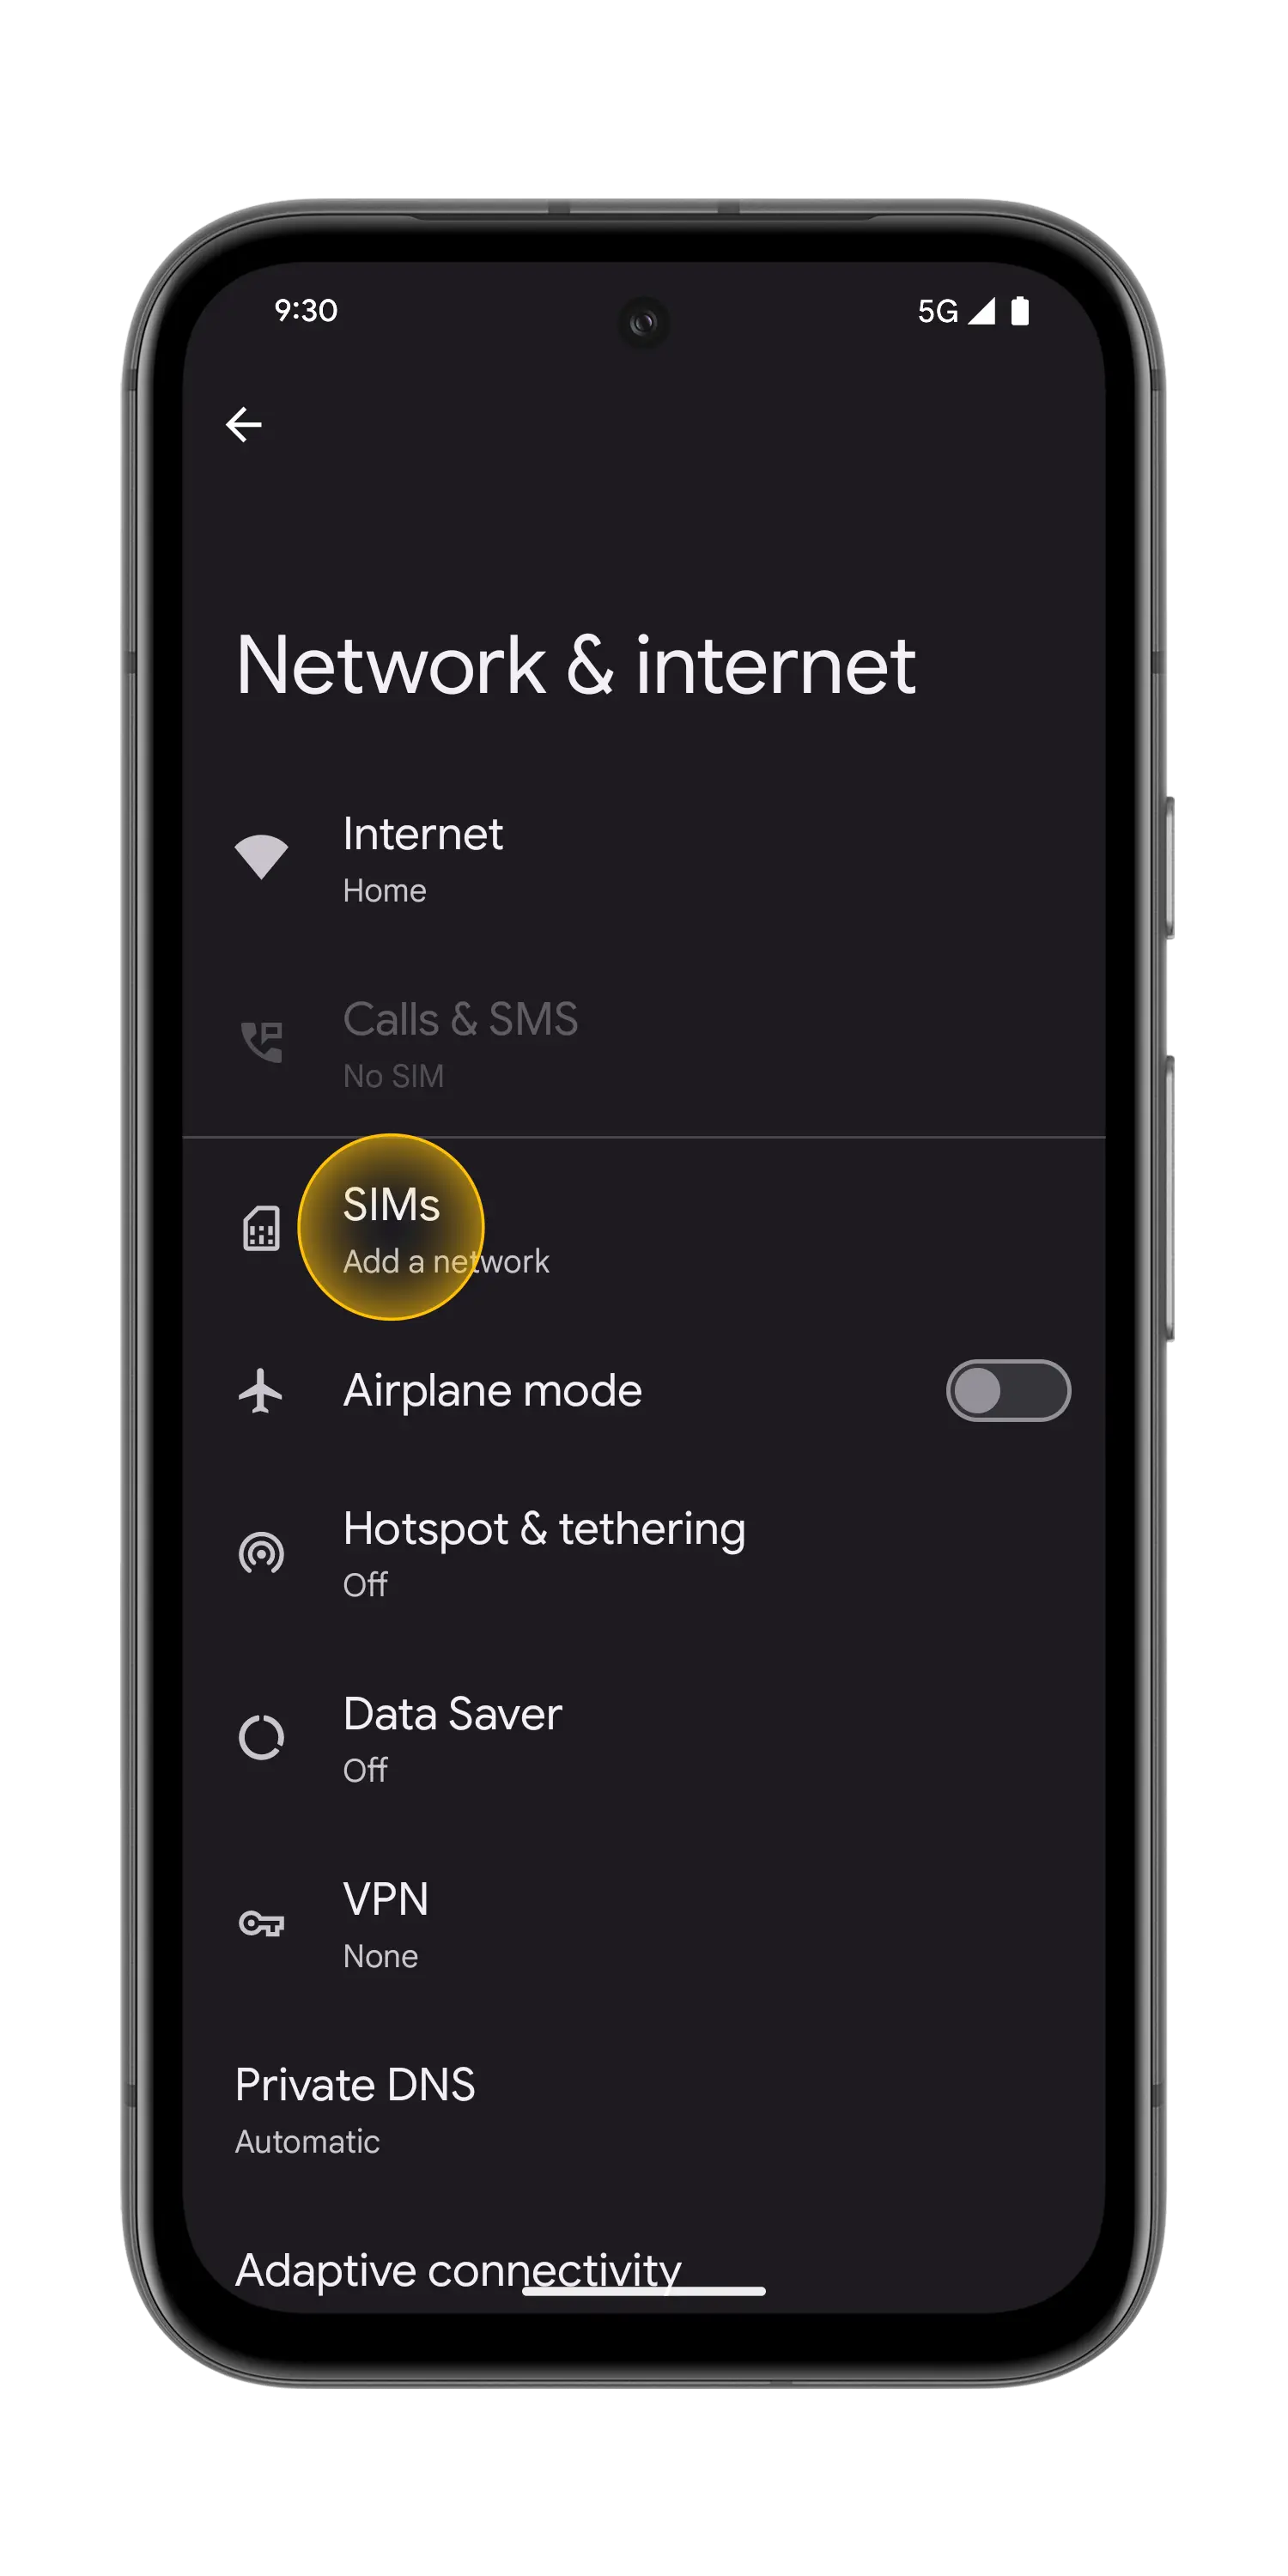
Open SIM manager
Tap on "SIM manager" or look for the "+" next to SIMs section
Download eSIM
Tap "Download eSIM" and scan the QR code
Enable Data Roaming
Make sure you have data roaming enabled
Pixel Manual setup instructions
If you cannot scan the QR code, follow these manual setup instructions:
Access manual setup
- Go to "Settings", tap "Network & internet", then tap "(+)" next to the SIMs section
- If it's not available tap "SIMs/Mobile network" on your device
- Tap "Download a SIM instead?", then tap "Next"
- Tap "Use a different network" if you need to confirm your network
Enter activation details
- Tap "Need help?", then tap "Enter it manually"
- Enter the SM-DP+ Address & Activation Code by copying it, tap "Continue", then tap "Download/Activate"
- Tap "Settings/Done" when you see the Download Finished screen
Important Notes
• Ensure data roaming is enabled after installation
• Your eSIM should be set for mobile data usage
General Tips
• Install the eSIM before your trip
• Activate for mobile data once you reach your destination
• Keep your primary SIM for calls and messages
• Enable data roaming on the eSIM
Xiaomi
Xiaomi devices with eSIM support offer easy installation. Follow these steps to set up your eSIM on your Xiaomi device.
What You Need
• A Xiaomi phone compatible with eSIM technology
• The installation email with QR code
• Stable internet connection
• Device must be unlocked for international networks
QR Code Installation
Follow these steps to install your eSIM using the QR code method on your Xiaomi device.
Installation Steps
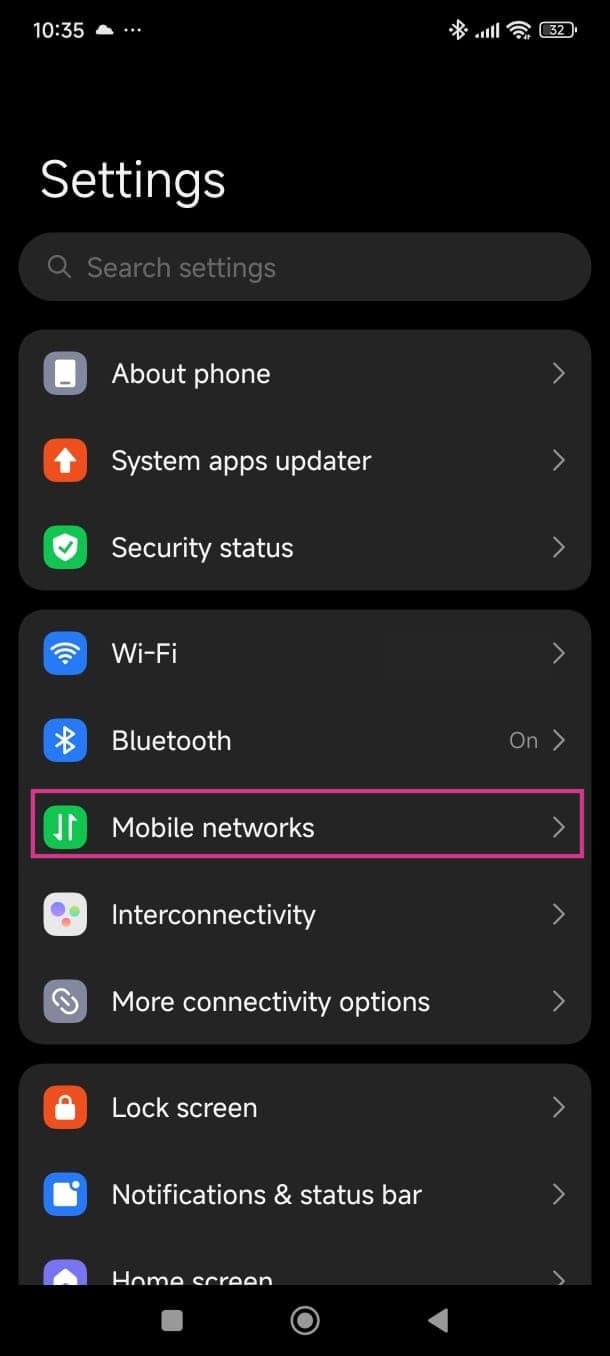
Access Mobile Networks
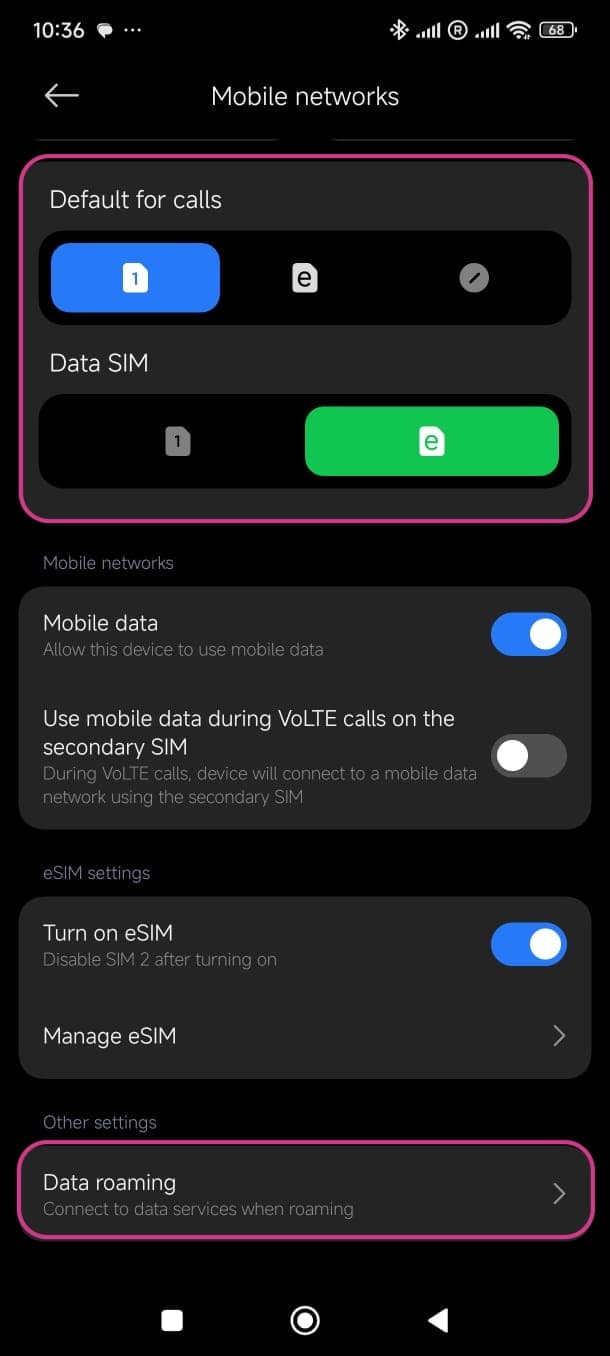
Go to Settings > Mobile networks
Enable eSIM
Turn on eSIM and tap on "Manage eSIM"
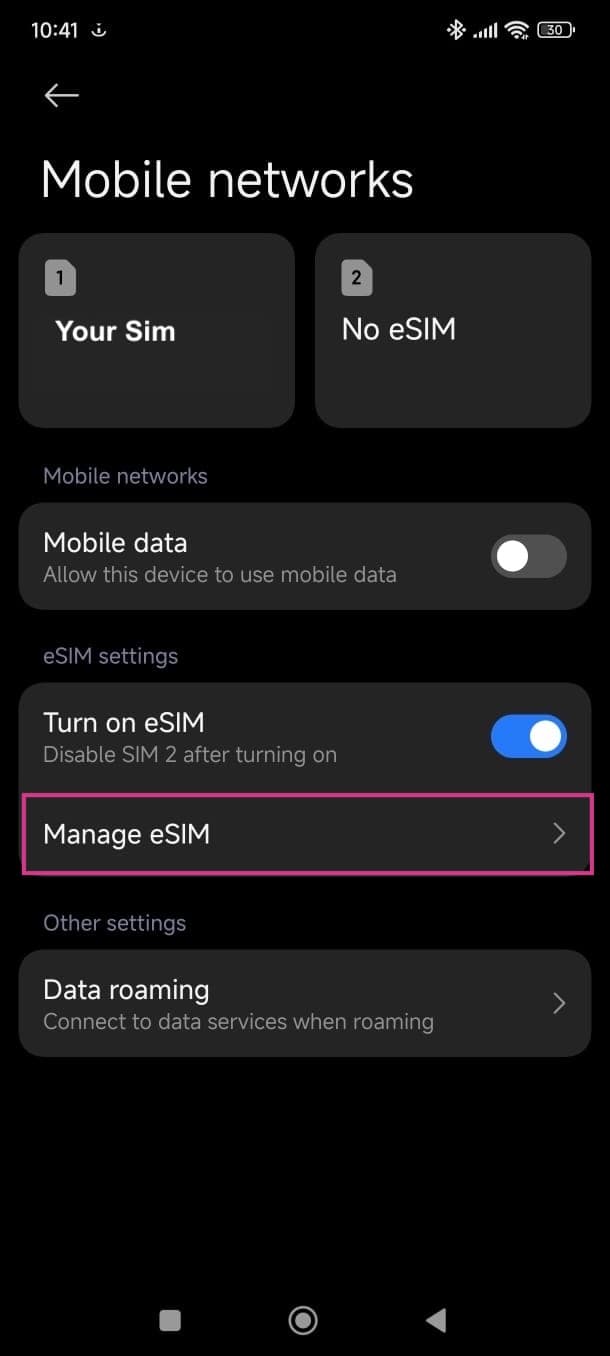
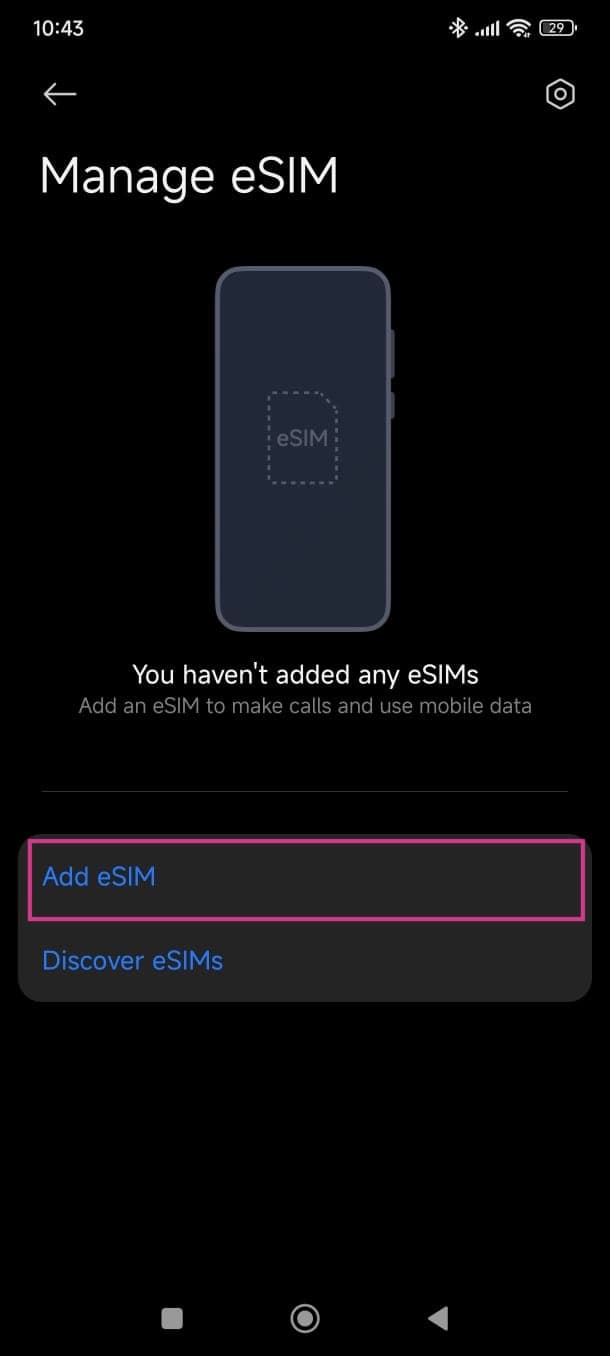
Add eSIM
Tap "Add eSIM" and scan the QR code
Configure Settings
Ensure your eSIM is set for mobile data, calls are on your main line, and data roaming is enabled
Xiaomi Manual setup instructions
If you cannot scan the QR code, follow these manual setup instructions:
Manual setup process
- Go to "Settings", tap "Mobile networks", then tap "Manage eSIM"
- Tap "Add eSIM"
- Instead of scanning the QR code, push "Add manually instead"
- Tap "Use activation code"
- Enter the SM-DP+ Address & Activation Code by copying it, tap Ok, then tap "Add"
- Tap "Got it" when you see the Download Finished screen
Important Notes
• If you plan to use your Xiaomi phone with international virtual SIM cards, ensure your device is unlocked to support other networks worldwide
• You need to have an internet connection when installing a new eSIM profile
• Ensure data roaming is enabled for international usage
General Tips
• Ensure your device is unlocked for international networks
• Install with internet connection available
• Set eSIM for mobile data, keep main SIM for calls
• Enable data roaming for international usage